Provision Gigaset Maxwell with Yeastar S-Series VoIP PBX
This guide provides instructions on how to provision Gigaset Maxwell with Yeastar S-Series VoIP PBX. The details in this guide takes Gigaset Maxwell 3 running firmware 2.22.7 as an example.
Supported phone models
This guide is applicable to the following devices:
- Maxwell 2, Maxwell 3
- Maxwell Basic
-
N670 IP PRO (supports up to 20 handsets)
-
N870 IP PRO (supports up to 50 handsets)
Factory reset the phone
Before provisioning the phone, you must reset the phone to factory defaults in case the device has residual settings of a previous configuration. To reset the phone, see How to Factory Reset Gigaset Maxwell.
Provision the phone via Plug’n’Play (PnP)
- Connect the phone to the same network of the Yeastar S-Series VoIP PBX.Note: Make sure that the phone and PBX are located in the same network segment, and do not connect the network via VPN.
- Check the phones' MAC address and phone model, usually you can find them at the back of phone.
- Log in Yeastar S-Series VoIP PBX web interface, go to Auto
Provisioning page, click Scan to scan
phones in the local network.
All the detected phones appear on the page.
- Find the phone from Device List, and then click
 .
. - Assign an extension for the phone.
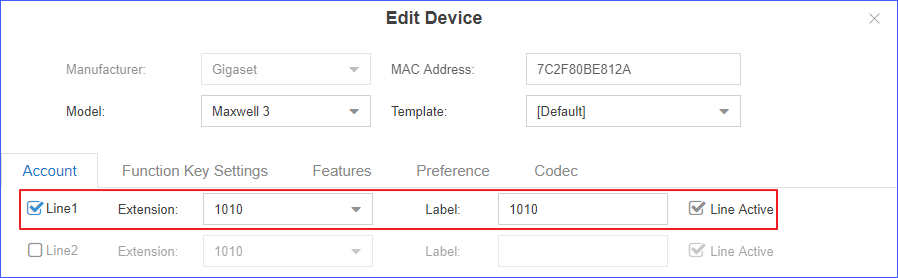
- Click Save.
A pop-up dialog prompts you whether to reboot the phone immediately.
- Click Yes.
The IP phone reboots automatically to get and apply configurations from the PBX.
-
If the IP phone doesn't reboot automatically, you need to reboot the phone manually to take effect.
-
Each time the IP phone reboots, it always gets the configurations from the PBX. In this case, the personal settings on the phone may be lost after the phone reboots.
Gigaset Maxwell Provisioning options
In addition to provision phone lines, you can provision other phone settings to match your needs.
- Function Key Settings
You can assign various functions to Function keys. This allows you to quickly access features and to view the monitored status when the Function keys are assigned with particular features (for example, BLF).
- Features
Enable or disable the phone features, such as Call Waiting, Voicemail, Transport Protocol, etc.
- Preference
Configure the phone preference settings, such as Language, Time Zone, Admin Password, etc.
- Codec
Select and configure the preferred codec list for the phone.
Note: At least one of the same codecs on the phone and the PBX is required, or there will be no audio in the call.