Customize Domain for NovoOne Portal
This topic describes how to add a custom domain for NovoOne portal.
Background information
You can customize domains for NovoOne portal for different regions to establish your own brand.
- Each region supports up to one custom domain.
- All custom domains across all regions configured by you and your colleagues are centrally displayed on the Domains list, while each domain is regionally isolated and operates independently.
After configuration, platform users (you,
your colleagues, your resellers, and resellers' colleagues) and tenant users (within
the tenants owned by you and your resellers in a specific region) can access NovoOne portal for the region via the associated custom domain
(e.g., doc.sg.sample.com).
Requirements and restrictions
- Requirements
-
You have subscribed to the White Label service. Each white label template includes one custom domain quota by default.Note: You can check subscribed resource details at My Subscription.
- Restrictions
-
Once the domain is successfully deployed, it cannot be changed. To deploy a new one, you must delete the previously configured domain and re-deploy the new one.
Procedure
- Step 1. Obtain CNAME records on NovoOne Platform
- Step 2. Configure domain resolution on DNS server
- (Optional) Step 3. Prepare domain certificatesNote: NovoOne Platform provides automatic certificate issuance and renew via Let's Encrypt. If you want to quickly deploy domains without manual certificate handling, you can skip this step and proceed to Step 4.
- Step 4. Check DNS resolution status on NovoOne Platform
- Step 5. Deploy domain certificates on NovoOne Platform
Step 1. Obtain CNAME records on NovoOne Platform
- Log in to NovoOne Platform portal, go to .
- Click Add Domain.
- In the Domain Information section, fill in the basic
information of custom portal domain.
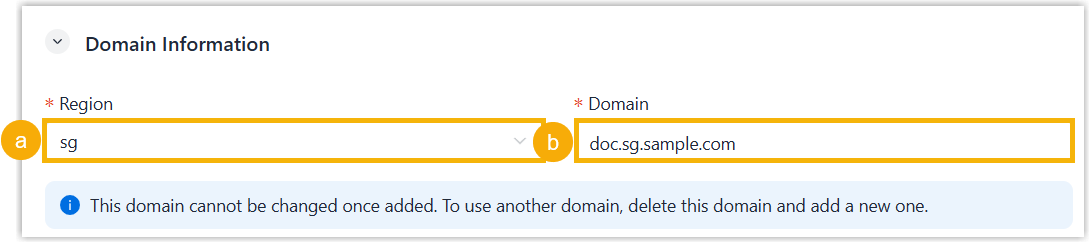
- In the Region drop-down list, select the desired region.
- In the Domain field, enter a custom portal
domain.
In this example, enter
doc.sg.sample.com.sample.comis the root domain.Note:- Wildcard domains (e.g.
*.itsp.com) and IP address are not allowed. - Multi-level domains are supported, such as
sample.com,sg.sample.comanddoc.sg.sample.com.
When the field loses focus, CNAME records auto-generated based on the selected region and portal domain are displayed in the DNS Configuration section.
- Wildcard domains (e.g.
- In the DNS Configuration
section, hover over the host and target domains in the CNAME record list,
then click
 to copy and note down them for later use.Tip: For host domains, the copy operation retrieves the subdomain portion for direct use in subsequent domain resolution. For example, the host domain is
api.doc.sg.sample.com, only its subdomain portionapi.doc.sgis copied for use.
Leave this Add Domains page open before proceeding.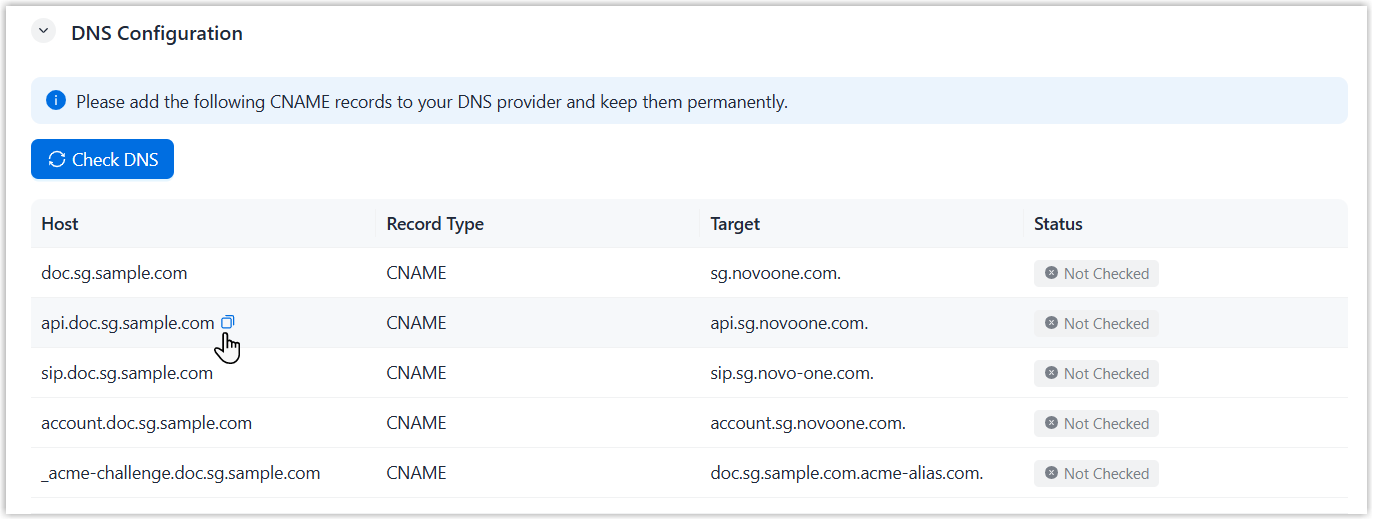
Step 2. Configure domain resolution on DNS server
- Register the root domain with a domain registrar.
In this example, register
sample.com. - Add the CNAME records obtained from NovoOne
Platform portal to your DNS server to point your host domains to the
corresponding CNAME target domains.Note: For Host fields, your DNS provider will automatically append the root domain (
sample.com). You only need to paste the raw data copied from NovoOne Platform portal into the field.
(Optional) Step 3. Prepare domain certificates
- Purchase a wildcard SSL certificate to cover the domains.
In this example, purchase a wildcard SSL certificate for
*.doc.sg.sample.com, which secures all subdomains underdoc.sg.sample.com. - Download the wildcard SSL
certificates and private key.Note:
-
NovoOne Platform uses NGINX as web server, so the downloaded SSL certificates should be compatible with NGINX server.
- RSA private key and EC private key are supported to secure the custom domain.
-
Step 4. Check DNS resolution status on NovoOne Platform
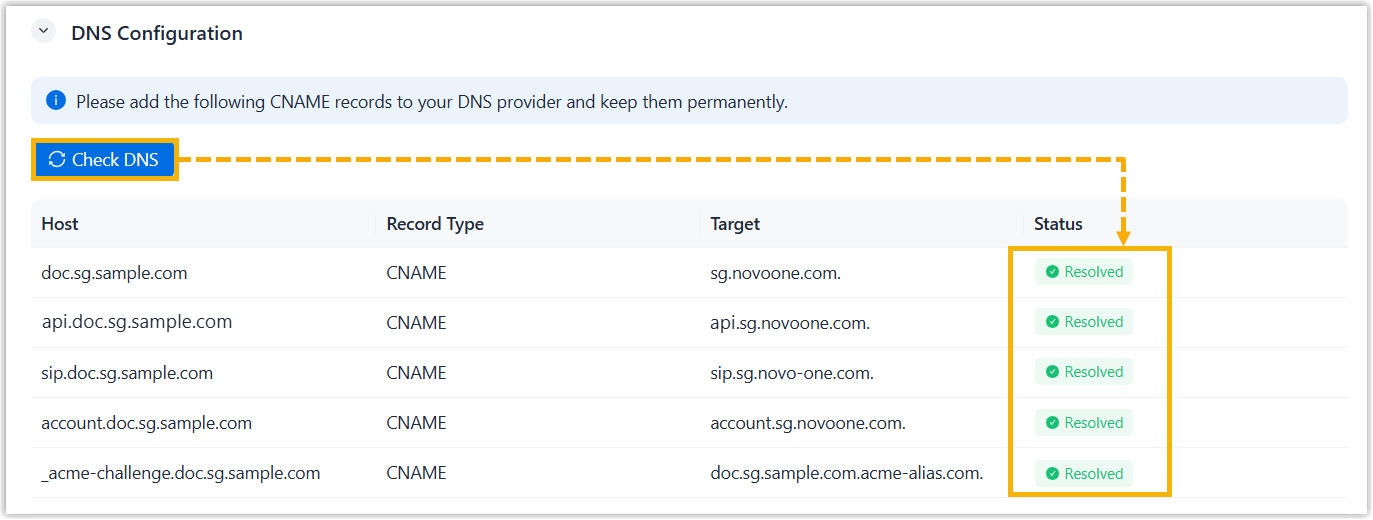
Check DNS resolution status to confirm all CNAME records have taken effect.
- Back to Add Domains page on NovoOne Platform portal.
-
In the DNS Configuration section, click Check DNS at the left-top corner of the CNAME record list.
The status of each CNAME record displays Checking and switches to Resolved after approximately 3 seconds.
Note: The status may display Not Resolved due to DNS propagation delays. You can click Check DNS later to re-run the detection.If the status remains Not Resolved, review the previous Step 2.
Step 5. Deploy domain certificates on NovoOne Platform
- Automatic certificate deployment
-
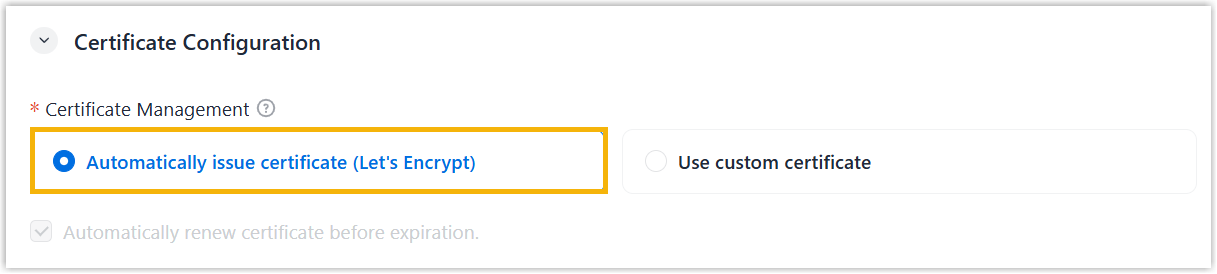
- In the
Certificate Configuration section, select
Automatically issue certificate (Let's
Encrypt) of Certificate
Management.
- Click Save.
- In the
Certificate Configuration section, select
Automatically issue certificate (Let's
Encrypt) of Certificate
Management.
- Manual certificate deployment
-
- In the Certificate
Configuration section, select Use custom
certificate of Certificate
Management.

- In the Private Key field, fill in the
PEM-encoded private key downloaded from Certified Authority (CA) in
one of the following methods.Note:
- The supported content formats are as follows:
Format Description RSA Start with -----BEGIN RSA PRIVATE KEY-----and end with-----END RSA PRIVATE KEY-----.EC Start with -----BEGIN EC PRIVATE KEY-----and end with-----END EC PRIVATE KEY-----.PKCS#8 Start with -----BEGIN PRIVATE KEY-----and end with-----END PRIVATE KEY-----. - The content must not exceed 16 KB.
- Copy the content of the private key and paste it in the field directly.
- Click
 beside the field to upload the
private key file with the
beside the field to upload the
private key file with the .keyextension.The content of uploaded private key is displayed in the Private Key field.
- The supported content formats are as follows:
- In the Certificate field, fill in the
PEM-encoded certificate obtained from the Certificate Authority (CA)
in one of the following methods.Note:
- The certificate must contain a COMPLETE Certificate Chain assembled in the following order: the Server Domain Certificate , followed by Intermediate Certificates, and ending with the Root CA Certificate.
- The content must not exceed 32 KB.
- Copy the content of the certificate and paste it in the field directly.
- Click beside the field to upload the
certificate file with a
.cer,.crt, or.pemextension.The content of uploaded certificate is displayed in the Certificate field.
The certificate information (status, authority and expiration date) is auto filled in the Certificate Information section.
- If you intend to manually apply and upload certificates by yourself
before expiration, deselect the checkbox of Automatically renew
certificate before expiration.Note: This setting is enabled by default. If enabled, the system will automatically issue and renew certificate via Let's Encrypt before expiration.
- Click Save.
- In the Certificate
Configuration section, select Use custom
certificate of Certificate
Management.
Result

What to do next
To customize portal appearance, customize tailor-fit branding options.