Install Yeastar Central Management System using Deployment Tool
This topic describes how to use the Yeastar Deployment Tool to install the complete Yeastar Central Management system, including the YCM server and all cluster servers, in your architecture.
Requirements and Restriction
- Requirements
-
- Your computer runs the Windows operating system, as the tools are
.exeapplications. - Your system has a Basic deployment architecture (i.e., no High Availability (HA) configured).
- The firmware version of the YCM server is 87.19.0.27 or later to ensure the operations can be performed successfully using the tools.
- Your computer runs the Windows operating system, as the tools are
- Restrictions
- The Deployment Tool has the following restrictions:
- Installation in environments with dual-network card configuration is not supported.
- The Yeastar TA gateway remote management (MGT) service configuration during installation is not supported.
Prerequisites
| Item | Prerequisites |
|---|---|
| Server |
|
| SSH Account | On all servers, create an SSH account
yeastar that meets the following
requirements:
|
| Resources |
|
Procedure
- On your computer, install and launch the Yeastar Deployment Tool.
- Log in with the default credentials.
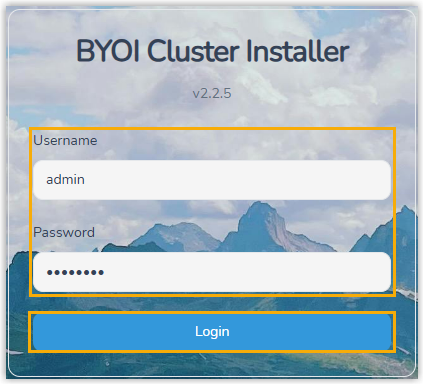
- Username:
admin - Password:
admin123
- Username:
- Follow the on-screen steps to complete the installation.
- Step 1: Server & Domain Configuration
- Step 2: Pre-Check
- Step 3. Port Connectivity Check
- Step 4: Download Packages
- Step 5: License Information
- Step 6: Render CM Config Template
- Step 7: CM Install
- Step 8: Validation
- Step 9: CM Render Cluster Config
- Step 10: Cluster Installation
- Step 11: Server Reboot
- Step 12: Cluster Validation
- Step 1: Server & Domain Configuration
- Enter the server information you've collected, and validate the server connectivity.
-
- Enter the required server information.Note:
- For wildcard domains, replace the wildcard
*with11. For example, if the domain is*.sbc.example.com, enter11.sbc.example.com. - When entering an IP address or domain name, make sure there are NO extra spaces, otherwise connection failures may occur.
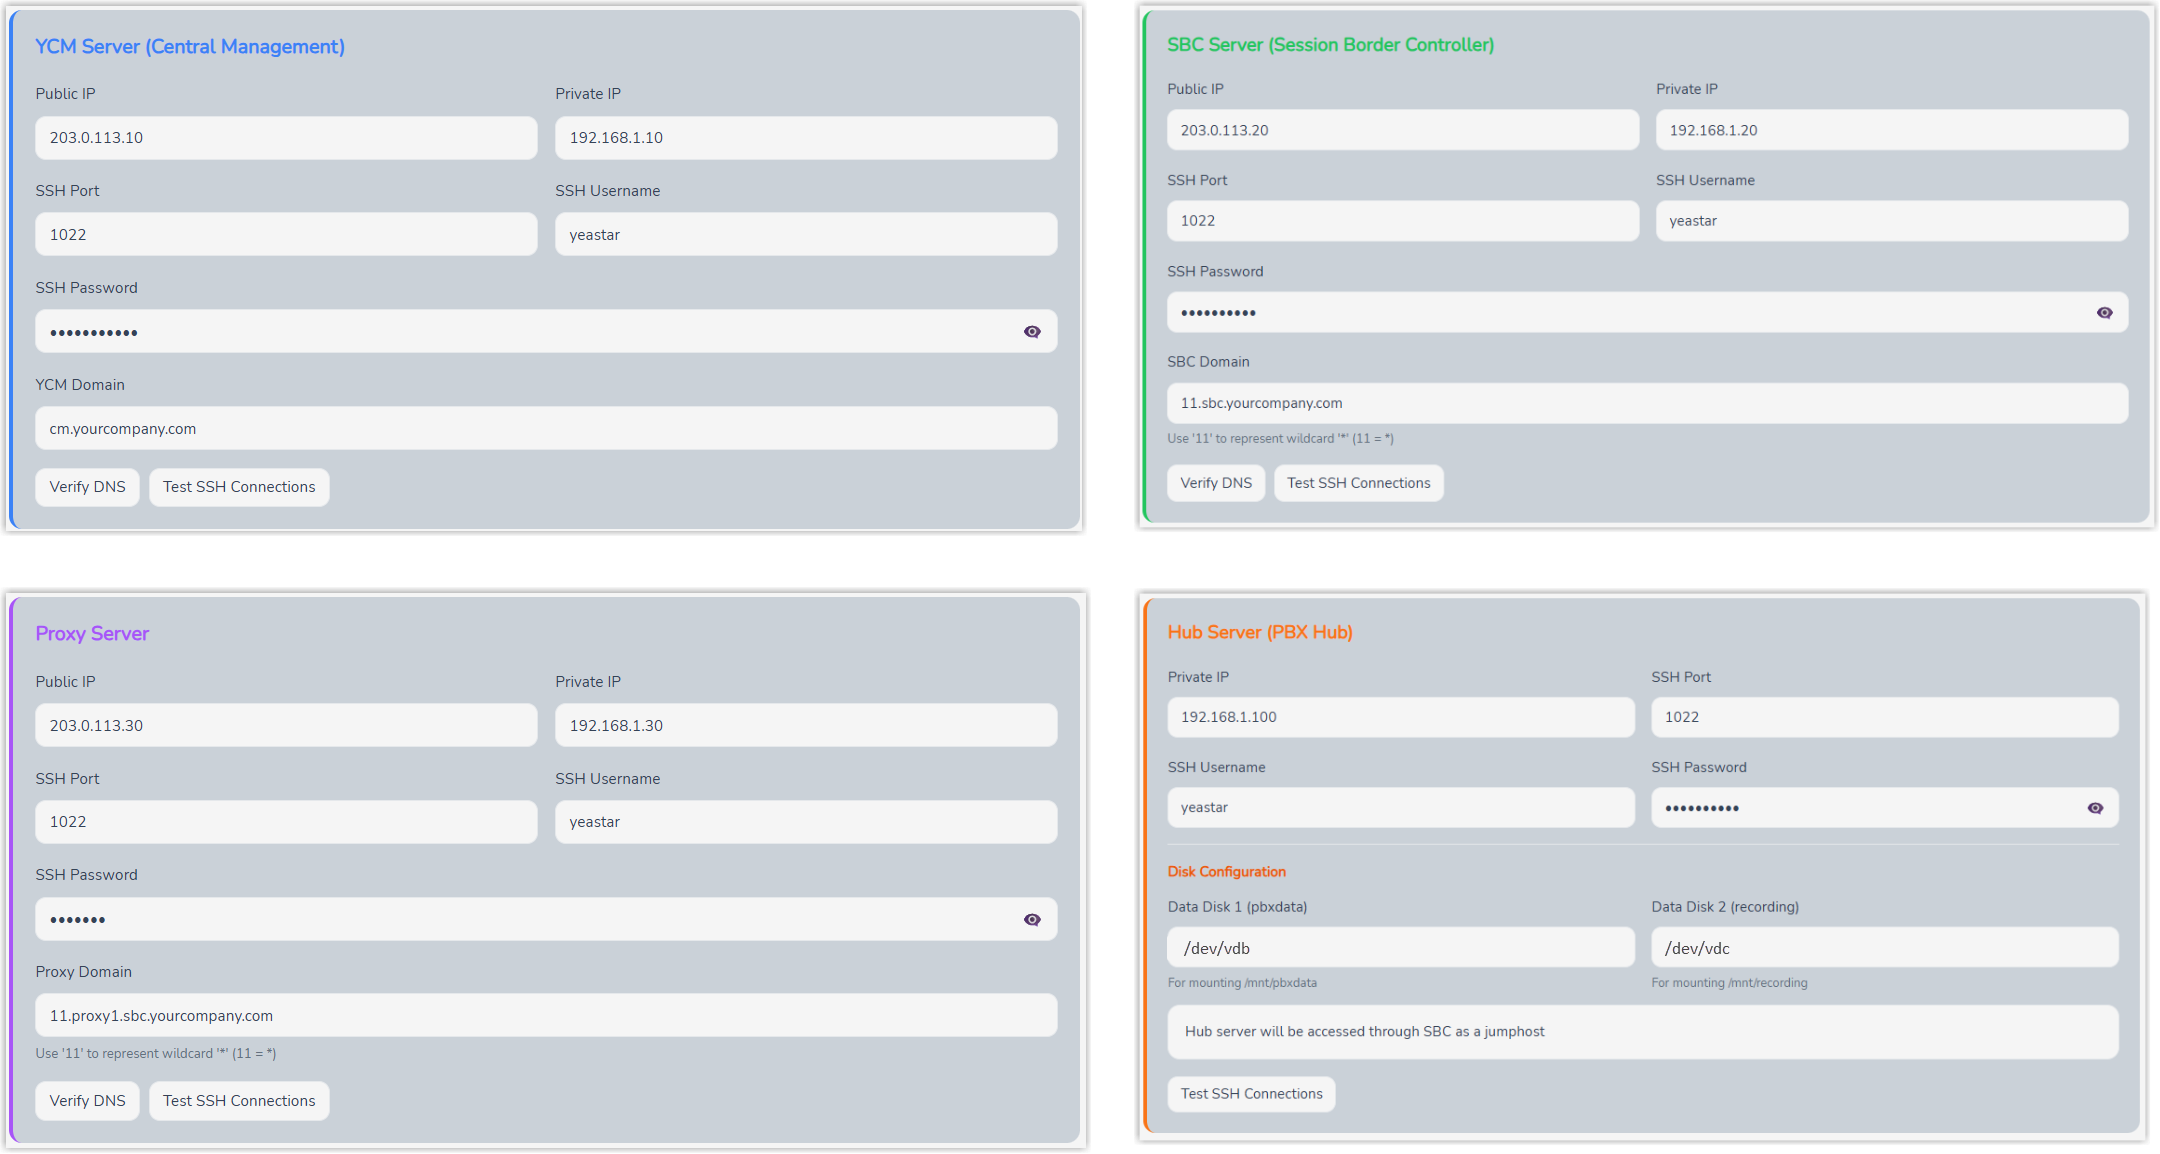
- For wildcard domains, replace the wildcard
- Click the corresponding buttons in each section to
validate the configurations.
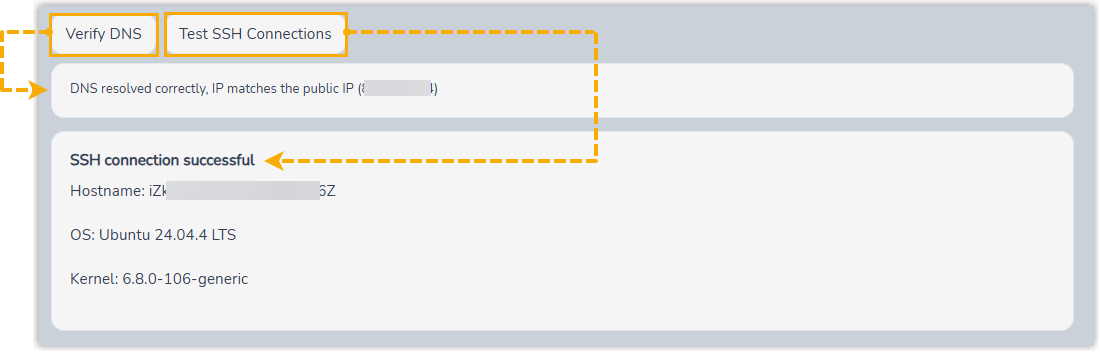
- Verify DNS: Check whether the domain name can be resolved to the server's public IP.
- Test SSH Connections: Check whether the tool can connect to the server using the SSH credentials.
Tip: You can also click Test All Connections and Verify All DNS at the bottom of the page to validate all servers at once. - Click Next to proceed.
- Enter the required server information.
- Step 2: Pre-Check
- Run a pre-check to verify whether the servers meet the
installation requirements.
- At the top-right corner of the page, click
Run All Checks.
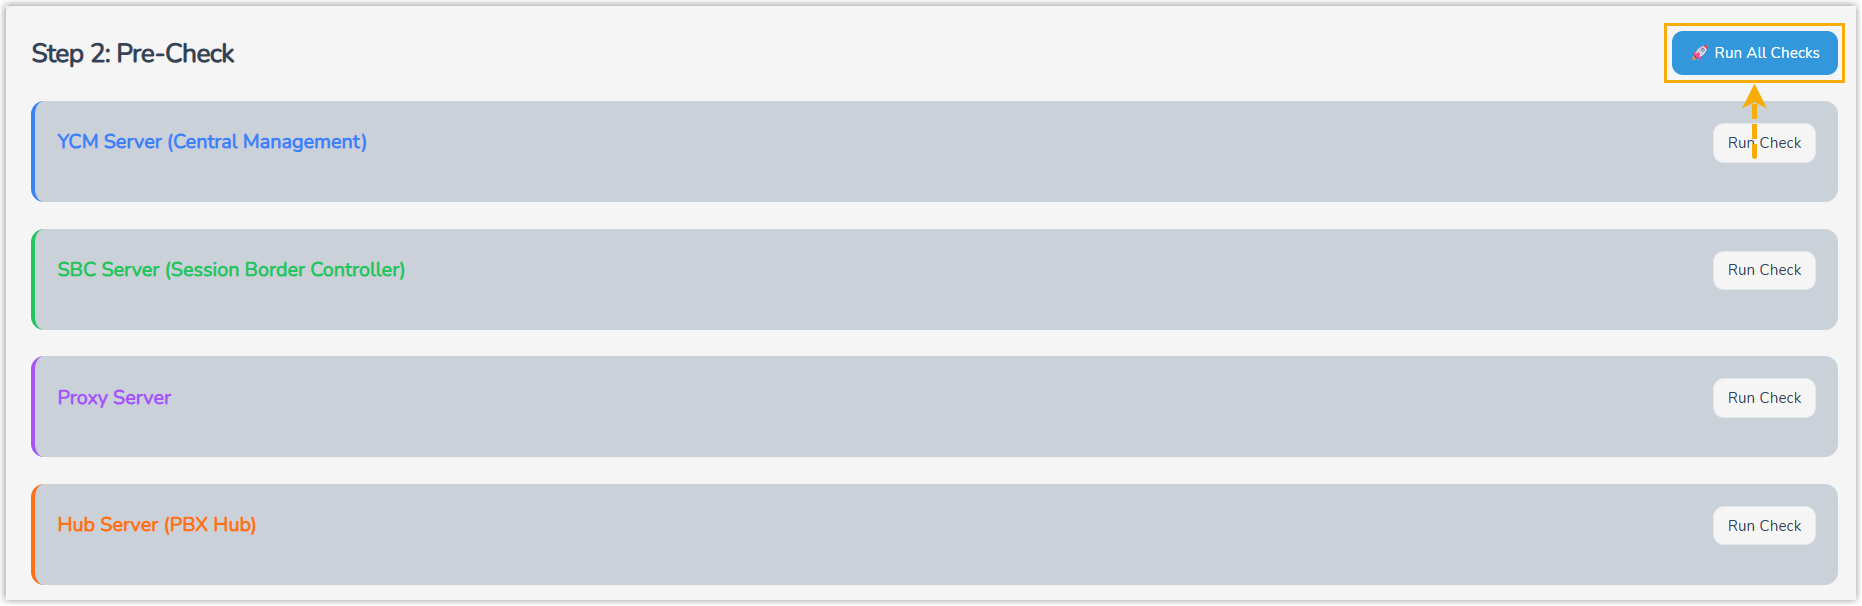
Wait for the check to complete. When an "All Passed" message is displayed, the environment pre-check has succeeded.
 Tip: You can click Details for any item to view the raw data.
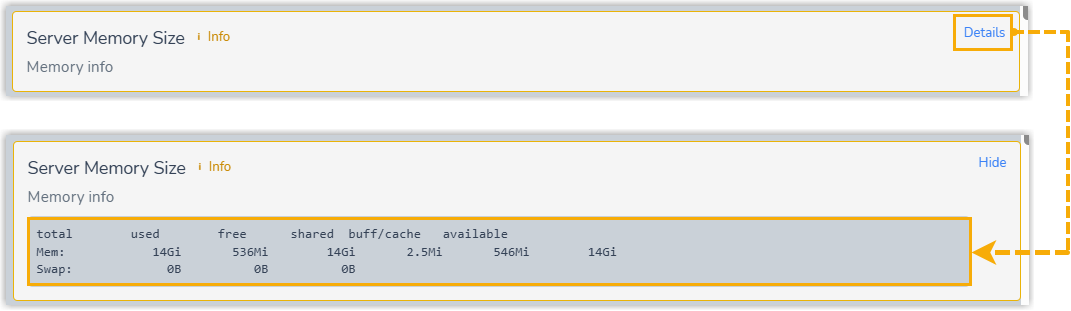
- Click Next to proceed.
- At the top-right corner of the page, click
Run All Checks.
- Step 3. Port Connectivity Check
- Verify the accessibility of required ports. The tool performs random checks on the port connectivity.
-
- At the top-right corner, click Run All
Checks.

The tool checks the port connectivity randomly. When an "All Reachable" message is displayed, the checked ports are accessible.
 Tip:
Tip:- You can click Show
Details to view the specific ports
that were checked.
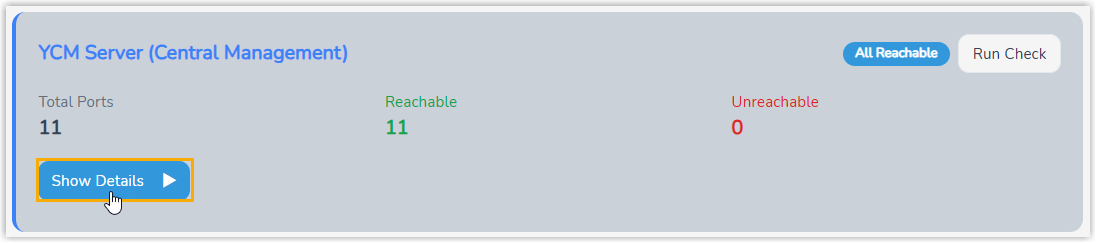
- If any ports do not pass the check, verify the firewall rules on the corresponding servers. After confirming the ports are open, proceed to the next step.
- You can click Show
Details to view the specific ports
that were checked.
- Click Next to proceed.
- At the top-right corner, click Run All
Checks.
- Step 4: Download Packages
- Download and extract the installation packages for YCM Server, SBC Server / SBC Proxy Server, and PBXHub Server.
-
- In the Package URL field,
paste the installation package download URL for the
following servers:
- YCM Server
- SBC Server / SBC Proxy Server
- PBXHub Server
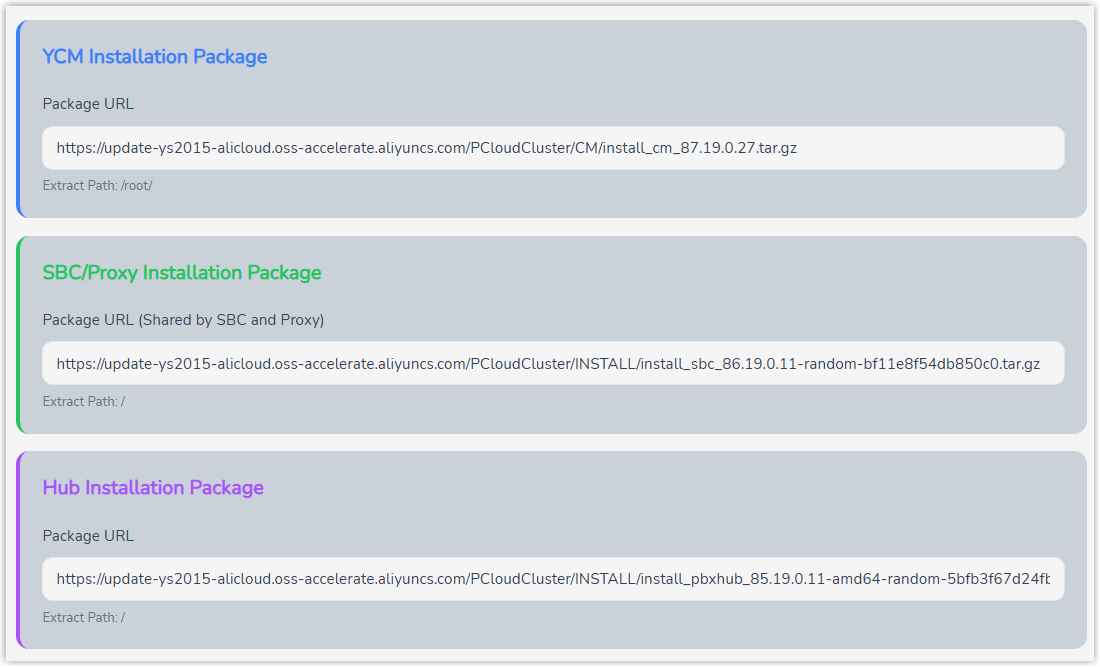
- At the bottom of the page, click Start
Download.
The tool begins downloading the packages. Wait a few minutes until the tool displays a "Downloaded" message for each server.
- Click Start Extract to
extract the downloaded package.
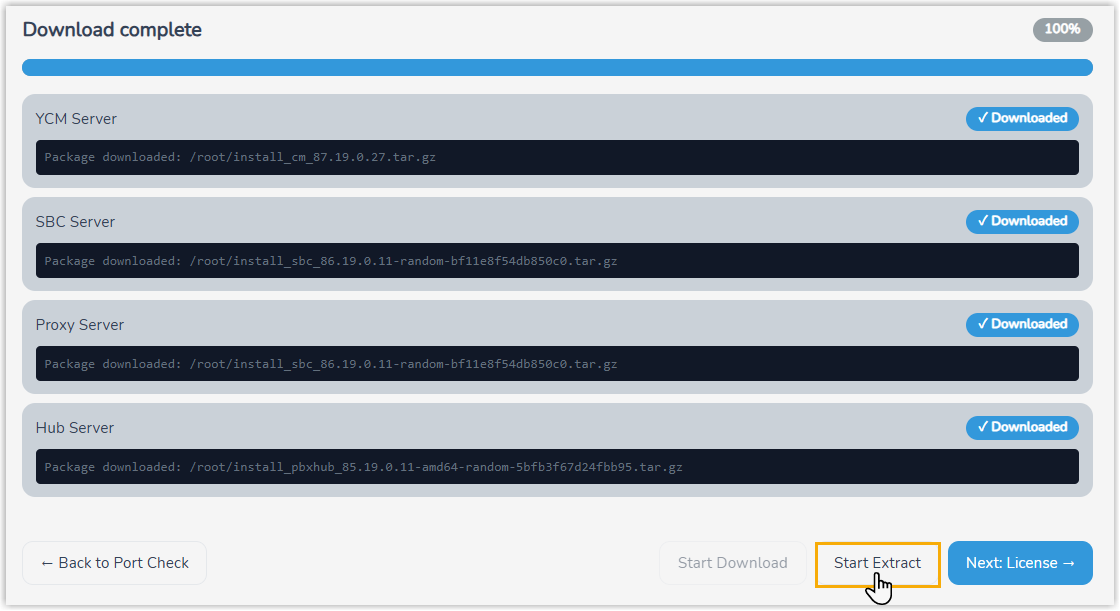
- Click Next to proceed.
- In the Package URL field,
paste the installation package download URL for the
following servers:
- Step 5: License Information
- Configure the license, environment mode, and region
identification for the Yeastar Central Management system.
- Configure the license settings:
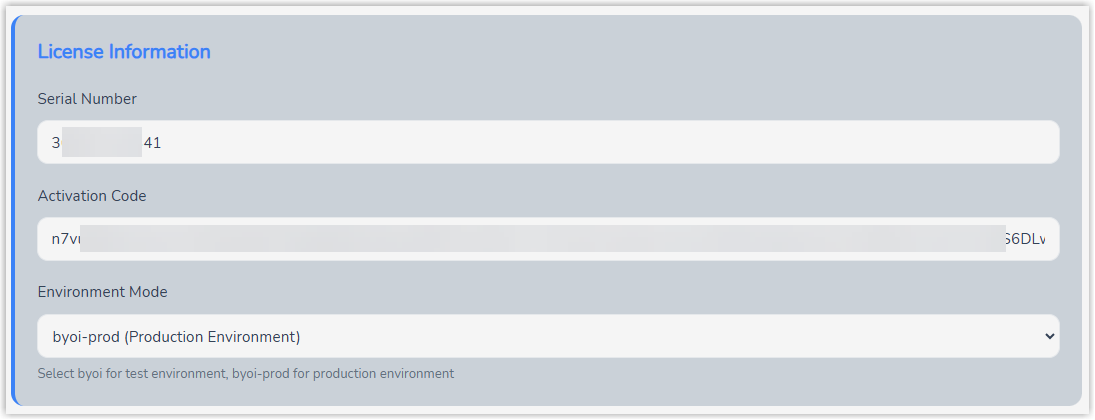
Setting Description Serial Number Paste the product serial number (SN) of your purchased BYOI package. Activation Code Paste the activation code of your purchased BYOI package. Environment Mode Select byoi-prod (Production Environment).
- In the Region Information
section, configure the basic identification
information for the cluster region.
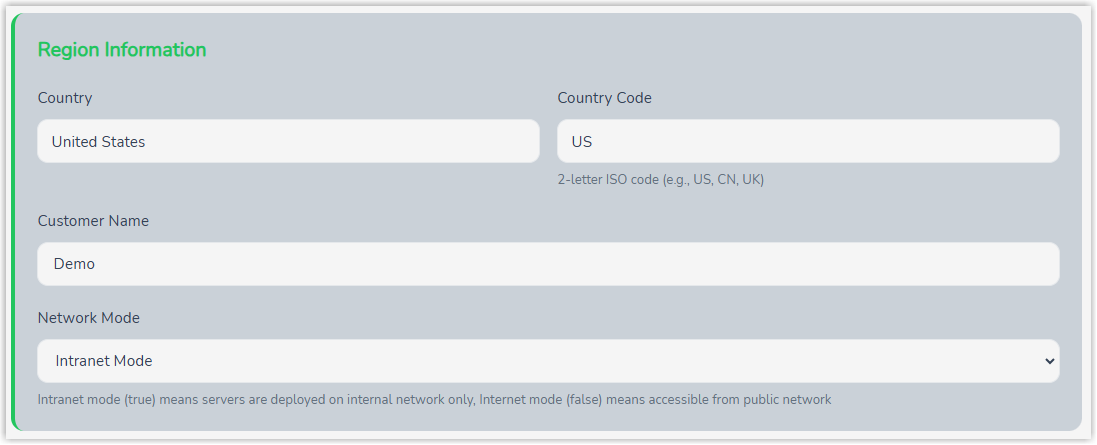
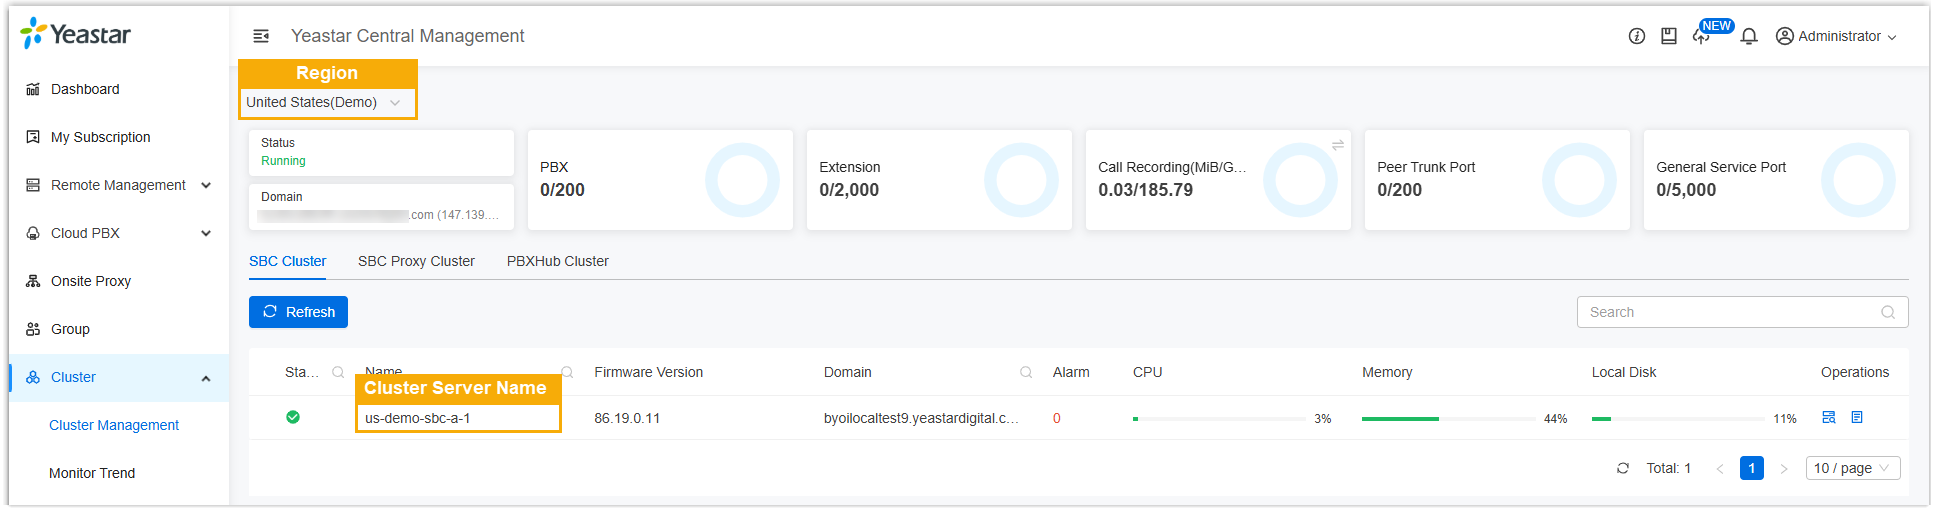
Setting Description Country Specify the country where the Yeastar Central Management system is located. Country Code Enter the corresponding country code. Customer Name Enter the customer name. The system combines this with the country and country code to generate the region name and cluster server information.
For example:
Network Mode Select the corresponding network mode based on your system environment: - Intranet Mode: The system is deployed on the internal network, and the network has been configured with NAT Loopback (port forwarding) to support access from the internal network via a public domain name or IP address.
- Internet Mode: The system is directly accessible from the public network.
- Click Next to proceed.
- Configure the license settings:
- Step 6: Render CM Config Template
- Populate the specific configuration settings into the server
configuration templates and deploy them to the YCM server.
- At the bottom of the page, click Deploy
Config Files.
The generated complete configuration files are deployed to the YCM server.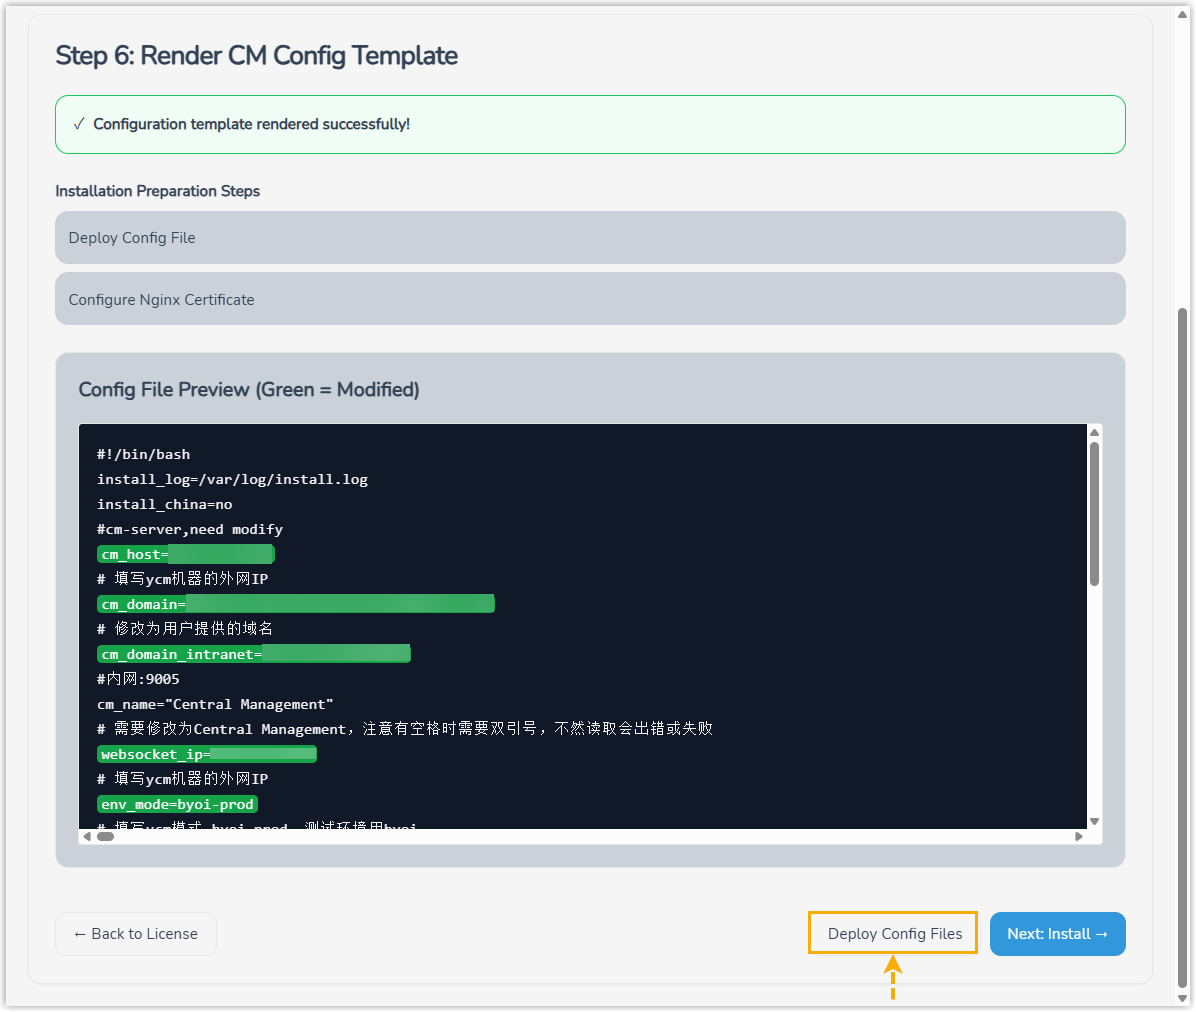

- Click Next to proceed.
- At the bottom of the page, click Deploy
Config Files.
- Step 7: CM Install
- Install the YCM server.
- At the bottom of the page, click Start CM
Installation.
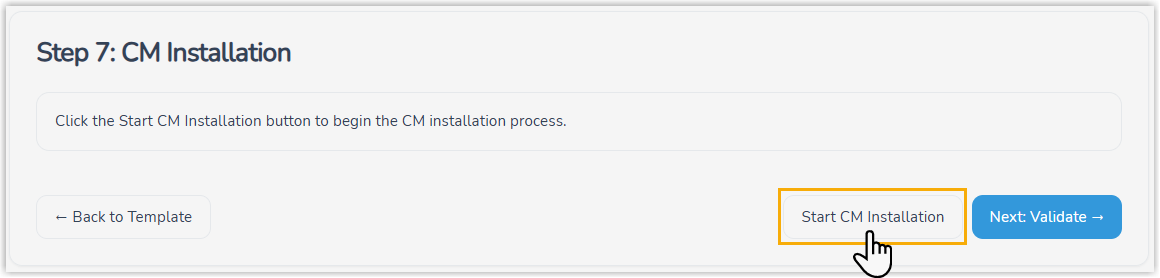
Wait until the installation completes and the interface displays "CM Installation Succeeded".

- Click Next to proceed.
- At the bottom of the page, click Start CM
Installation.
- Step 8: Validation
- Validate the service status on the YCM server after installation.
- Click Start
Validation.
The tool starts to validate the service status on the YCM server, and displays the result.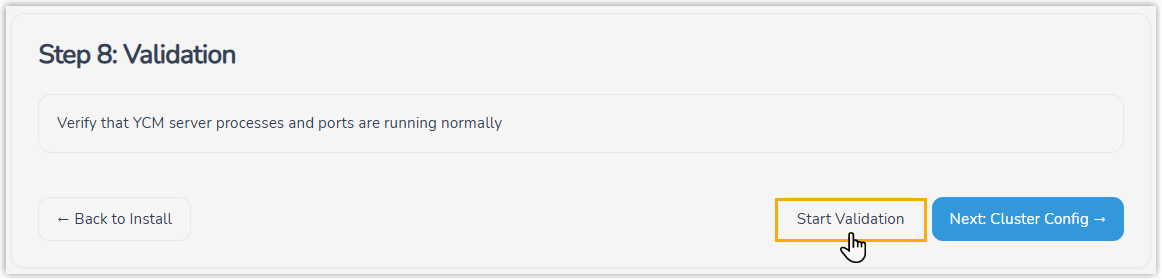

- Click Next to proceed.
- Click Start
Validation.
- Step 9: CM Render Cluster Config
- Obtain the authentication code, then render and deploy the
cluster configuration to the cluster servers.
- Click Auth Code to obtain the
authentication code from the YCM Server.
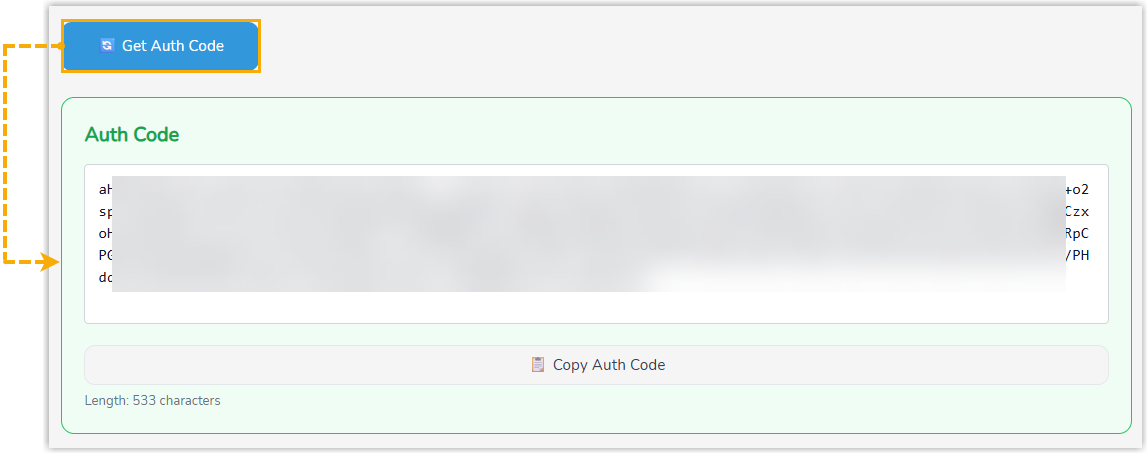
Click Render Config Files.
The tool populates the specific configuration settings into the configuration templates of the cluster servers and generates the complete configuration files.
- Click Deploy Config
Files.
The generated complete configuration files are deployed to the cluster servers.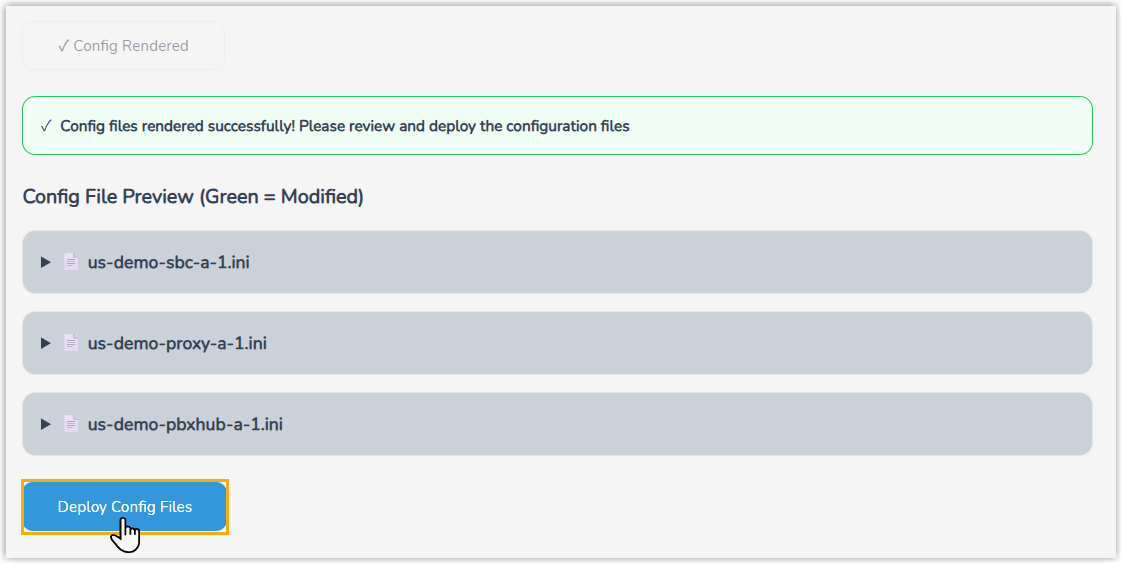

- Click Next to proceed.
- Click Auth Code to obtain the
authentication code from the YCM Server.
- Step 10: Cluster Installation
- Install the cluster servers, including SBC Server, SBC Proxy
Server, and PBXHub Server.Important: Do NOT navigate away from this page until the installation is fully completed.
- Click Install All on each
server to start the installation.Note:
-
The installation for the three servers run independently. You can execute any step on any server individually, or start the installation on multiple servers simultaneously.
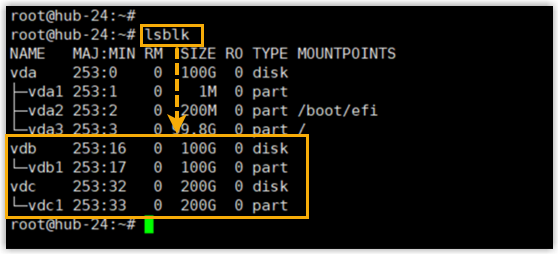
- If the PBXHub Server installation is
interrupted and needs to be restarted, you need to
reset the data disk of PBXHub (under the server
list) to clear its data disk before
reinstalling.

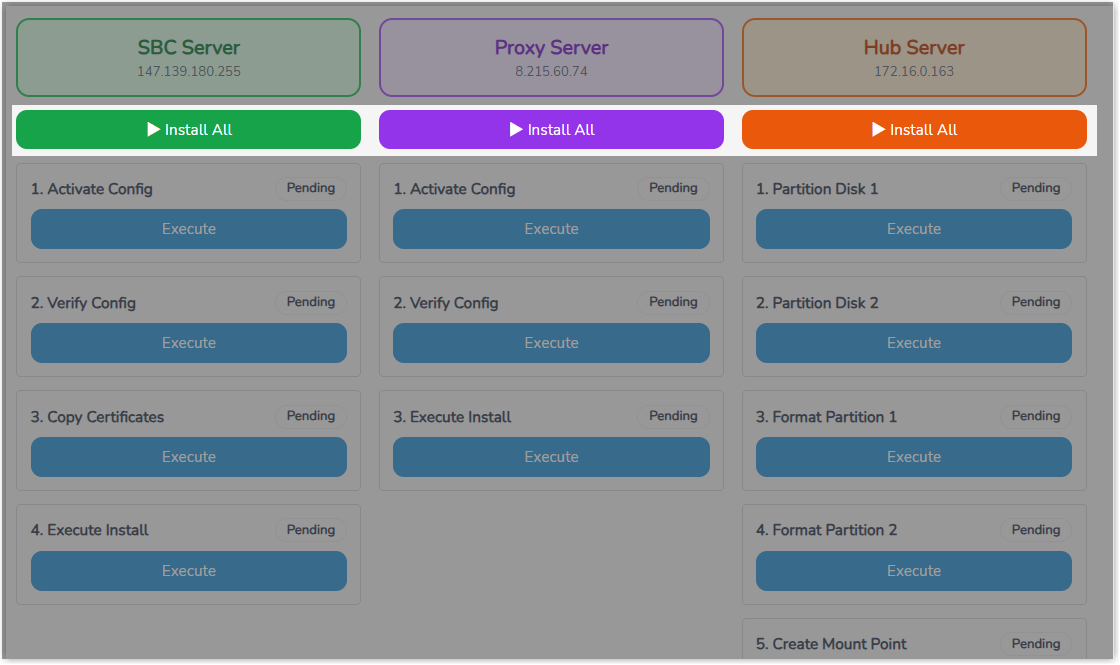
-
- Optional: Export the installation logs for
troubleshooting purposes.

- Click Next to proceed.
- Click Install All on each
server to start the installation.
- Step 11: Server Reboot
- Reboot the servers in the required sequence to complete the installation.
- Reboot the cluster servers.
- Click Staged
Reboot.

- Click OK in the pop-up window.
The tool automatically initiates rebooting on the cluster servers in the required sequence.
- Click Staged
Reboot.
- Reboot the YCM Serer.
- Select the checkbox of YCM
Server in the server list, then click
Reboot Selected
Servers.

- Click OK in the pop-up window.
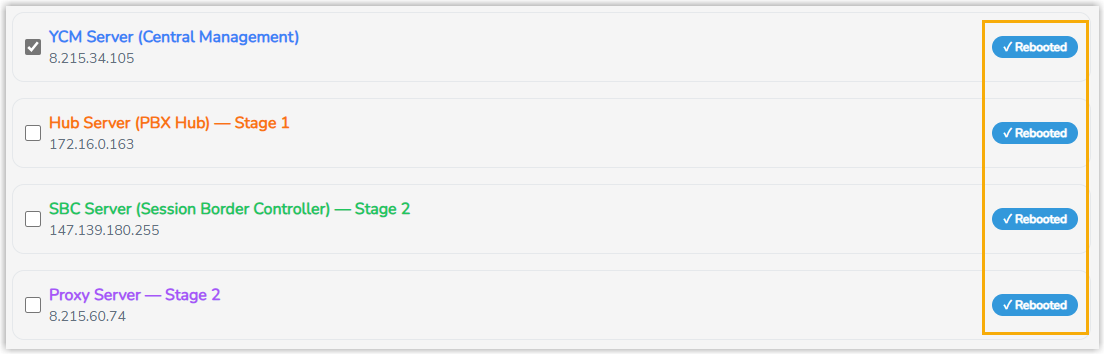
- Select the checkbox of YCM
Server in the server list, then click
Reboot Selected
Servers.
- Click Next to proceed.
- Reboot the cluster servers.
- Step 12: Cluster Validation
- Perform post-installation validation and configuration for
the system.
- In the Modify Customer Account
Password section, set the login
credentials for the Yeastar Central Management
portal.
- Enter the email and password that will be used
to log in to the web portal.
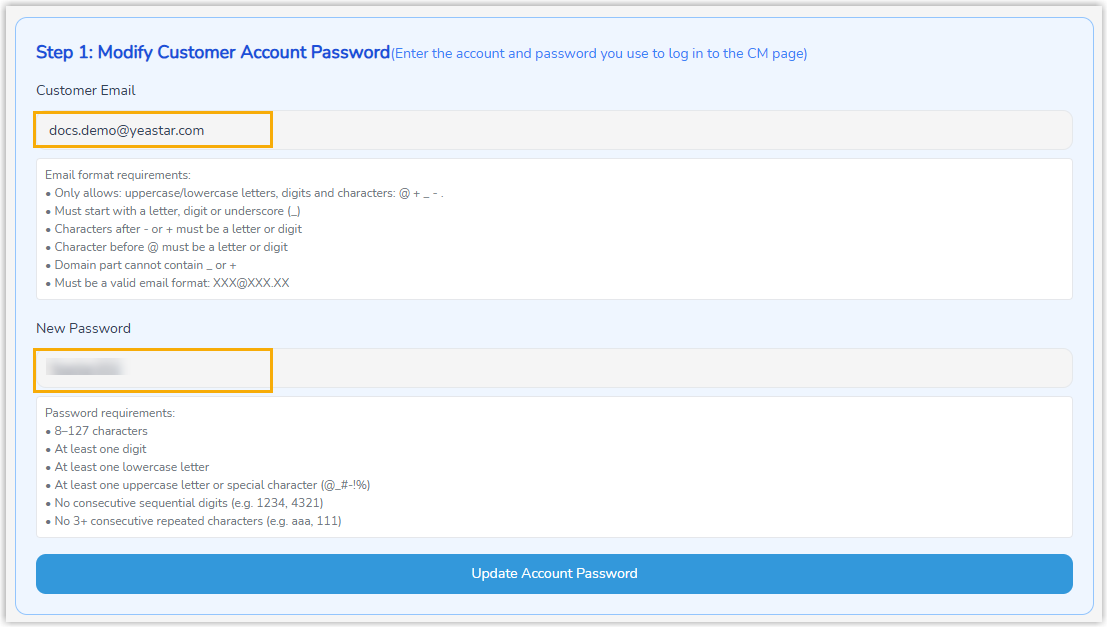
- Customer Email: Enter the email address.
- New Password: Set a password.
- Click Update Account Password.
- Enter the email and password that will be used
to log in to the web portal.
- Optional: In the Modify Cluster
Status section, update cluster
identification information if needed.
- Modify the desired information.
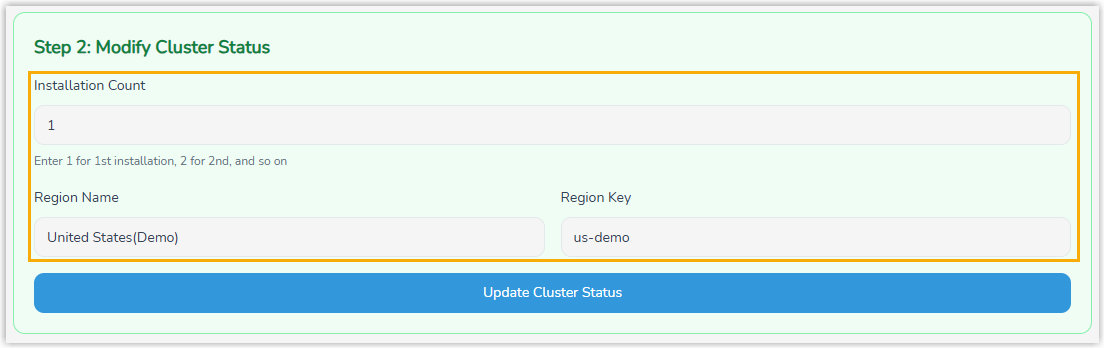
Setting Description Installation Count Tracks the number of installations. Keep the setting as 1 for a new system installation. Region Name The name of the cluster region. Region Key A unique identifier for the region. - Click Update Cluster Status.
- Modify the desired information.
- In the Check All Server
Information section, verify the health
and status of all servers.
- Click Start Checking All
Servers.
The tool validates running processes, port status, database connectivity, and other system information on all servers.
- Review the results to ensure all checks have
passed.
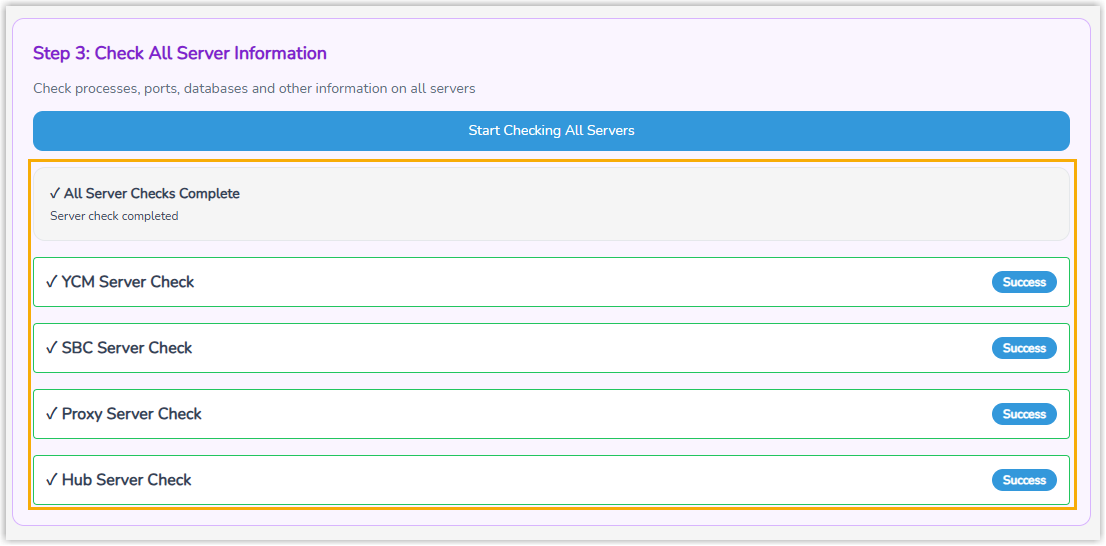
- Click Start Checking All
Servers.
- Optional: In the Export
Installation Information section,
click Export Installation
Info to export installation data for
troubleshooting or record-keeping.

- In the Modify Customer Account
Password section, set the login
credentials for the Yeastar Central Management
portal.
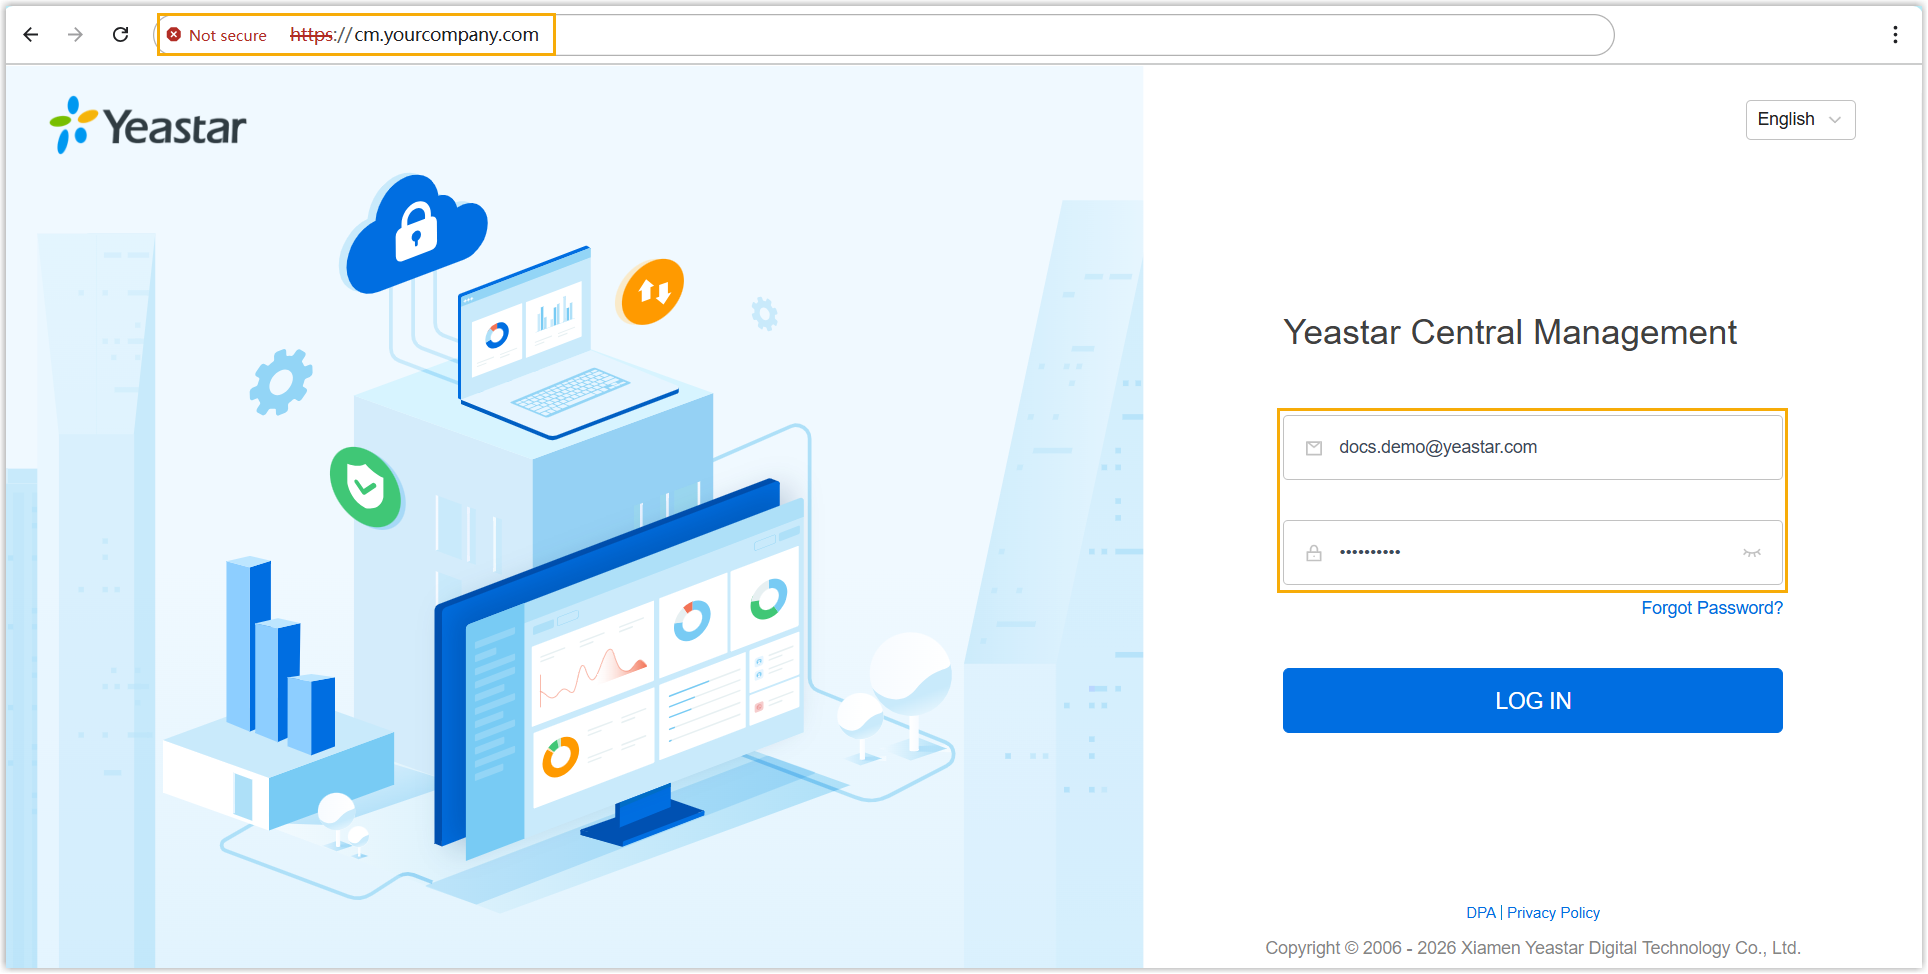
Result
The system installation is complete. You can log in to the Yeastar Central Management web portal using the YCM domain name and the credentials you configured.
What to do next
After completing the installation, it is recommended to perform the following configurations on Yeastar Central Management web portal to enable full functionality:
-
Configure domain certificates for secure HTTP access.
Upload domain certificates (if available) or directly apply for certificates on the web portal (Path: ).- SBC Server / SBC Proxy Server: Upload or apply for the
corresponding wildcard domain certificates, e.g.,
*.sbc.example.comand*.proxy1.sbc.example.com. - YCM Server: Upload or apply for a single domain certificate
for YCM (e.g.,
cm.yourcompany.com) and a wildcard domain certificate for remote management (e.g.,*.cm.yourcompany.com).
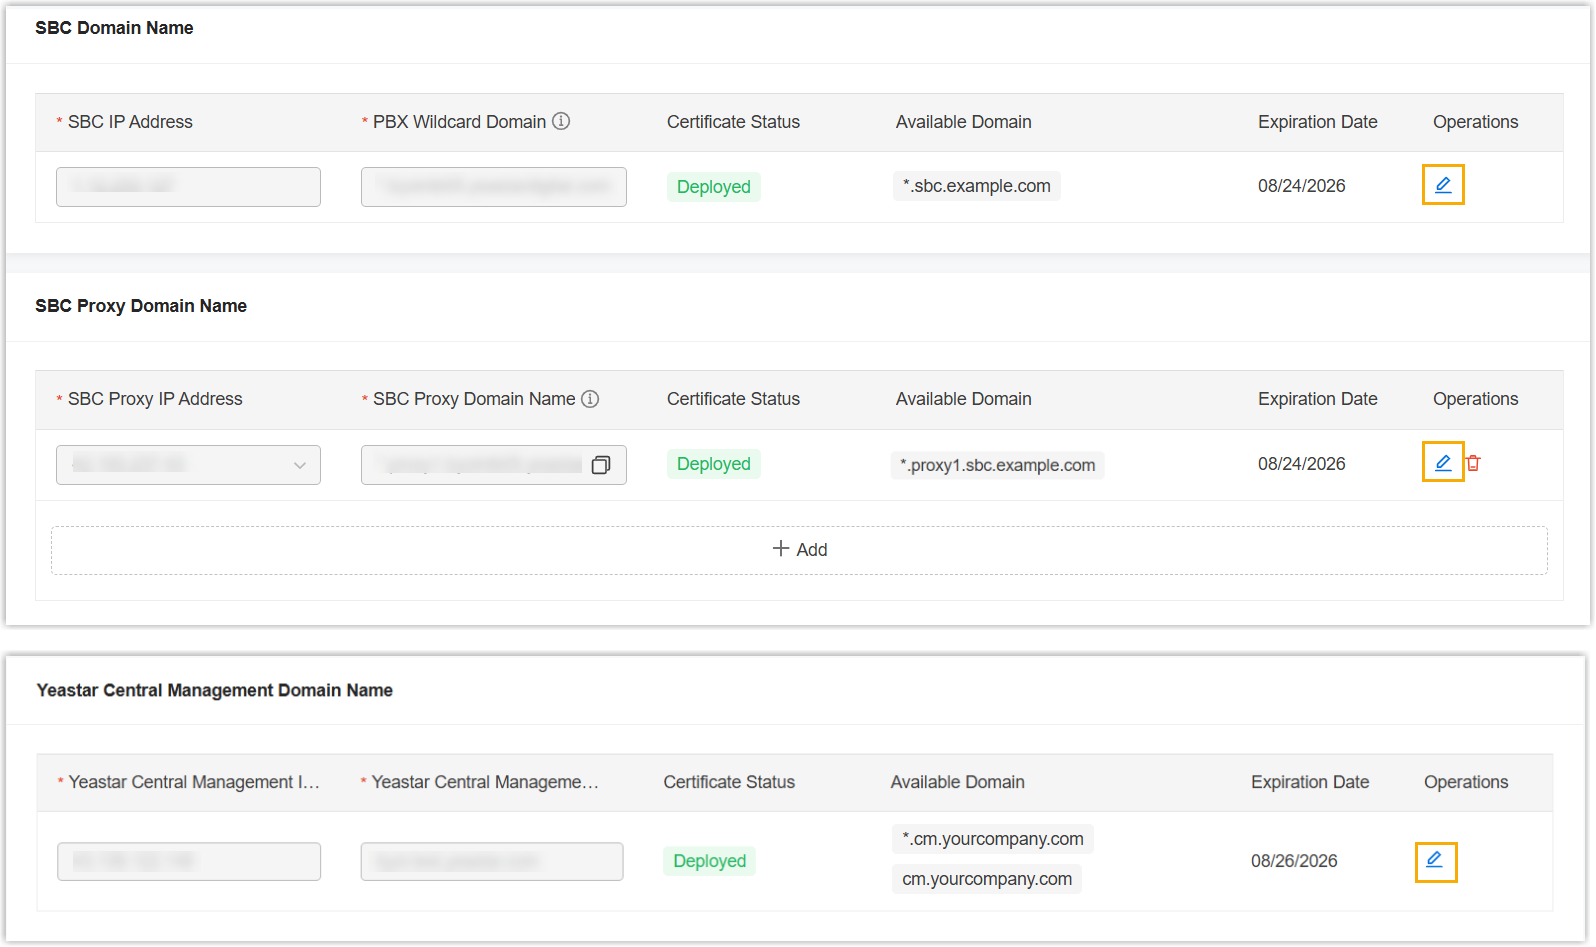
For more information, see Management Guide - Domain Management.
- SBC Server / SBC Proxy Server: Upload or apply for the
corresponding wildcard domain certificates, e.g.,
Configure email server to enable system email notifications.
Set up the email server on the web portal (Path: ).
For more information, see Management Guide - Email Server Overview.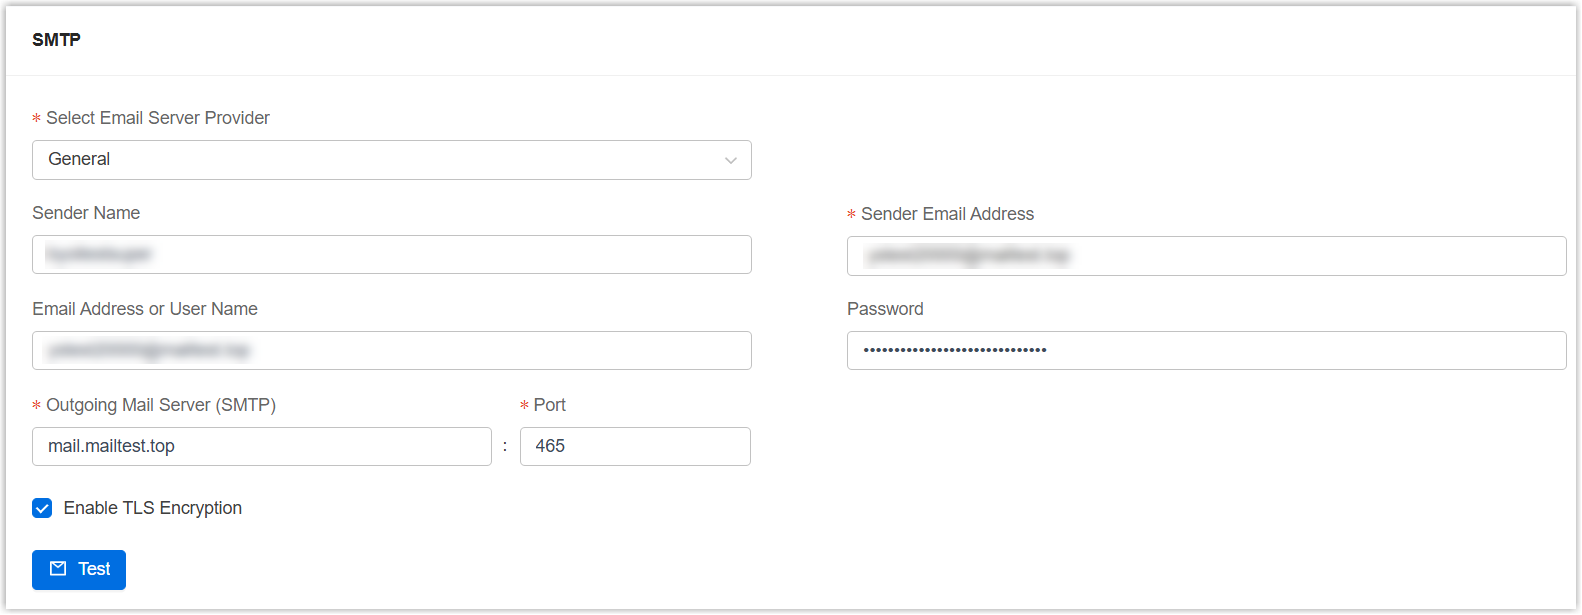
-
Verify system functionality.
Create a cloud PBX on the web portal (Path: ), then log in to the PBX to create extensions test internal calls between extensions to verify that the call functionality is working properly.
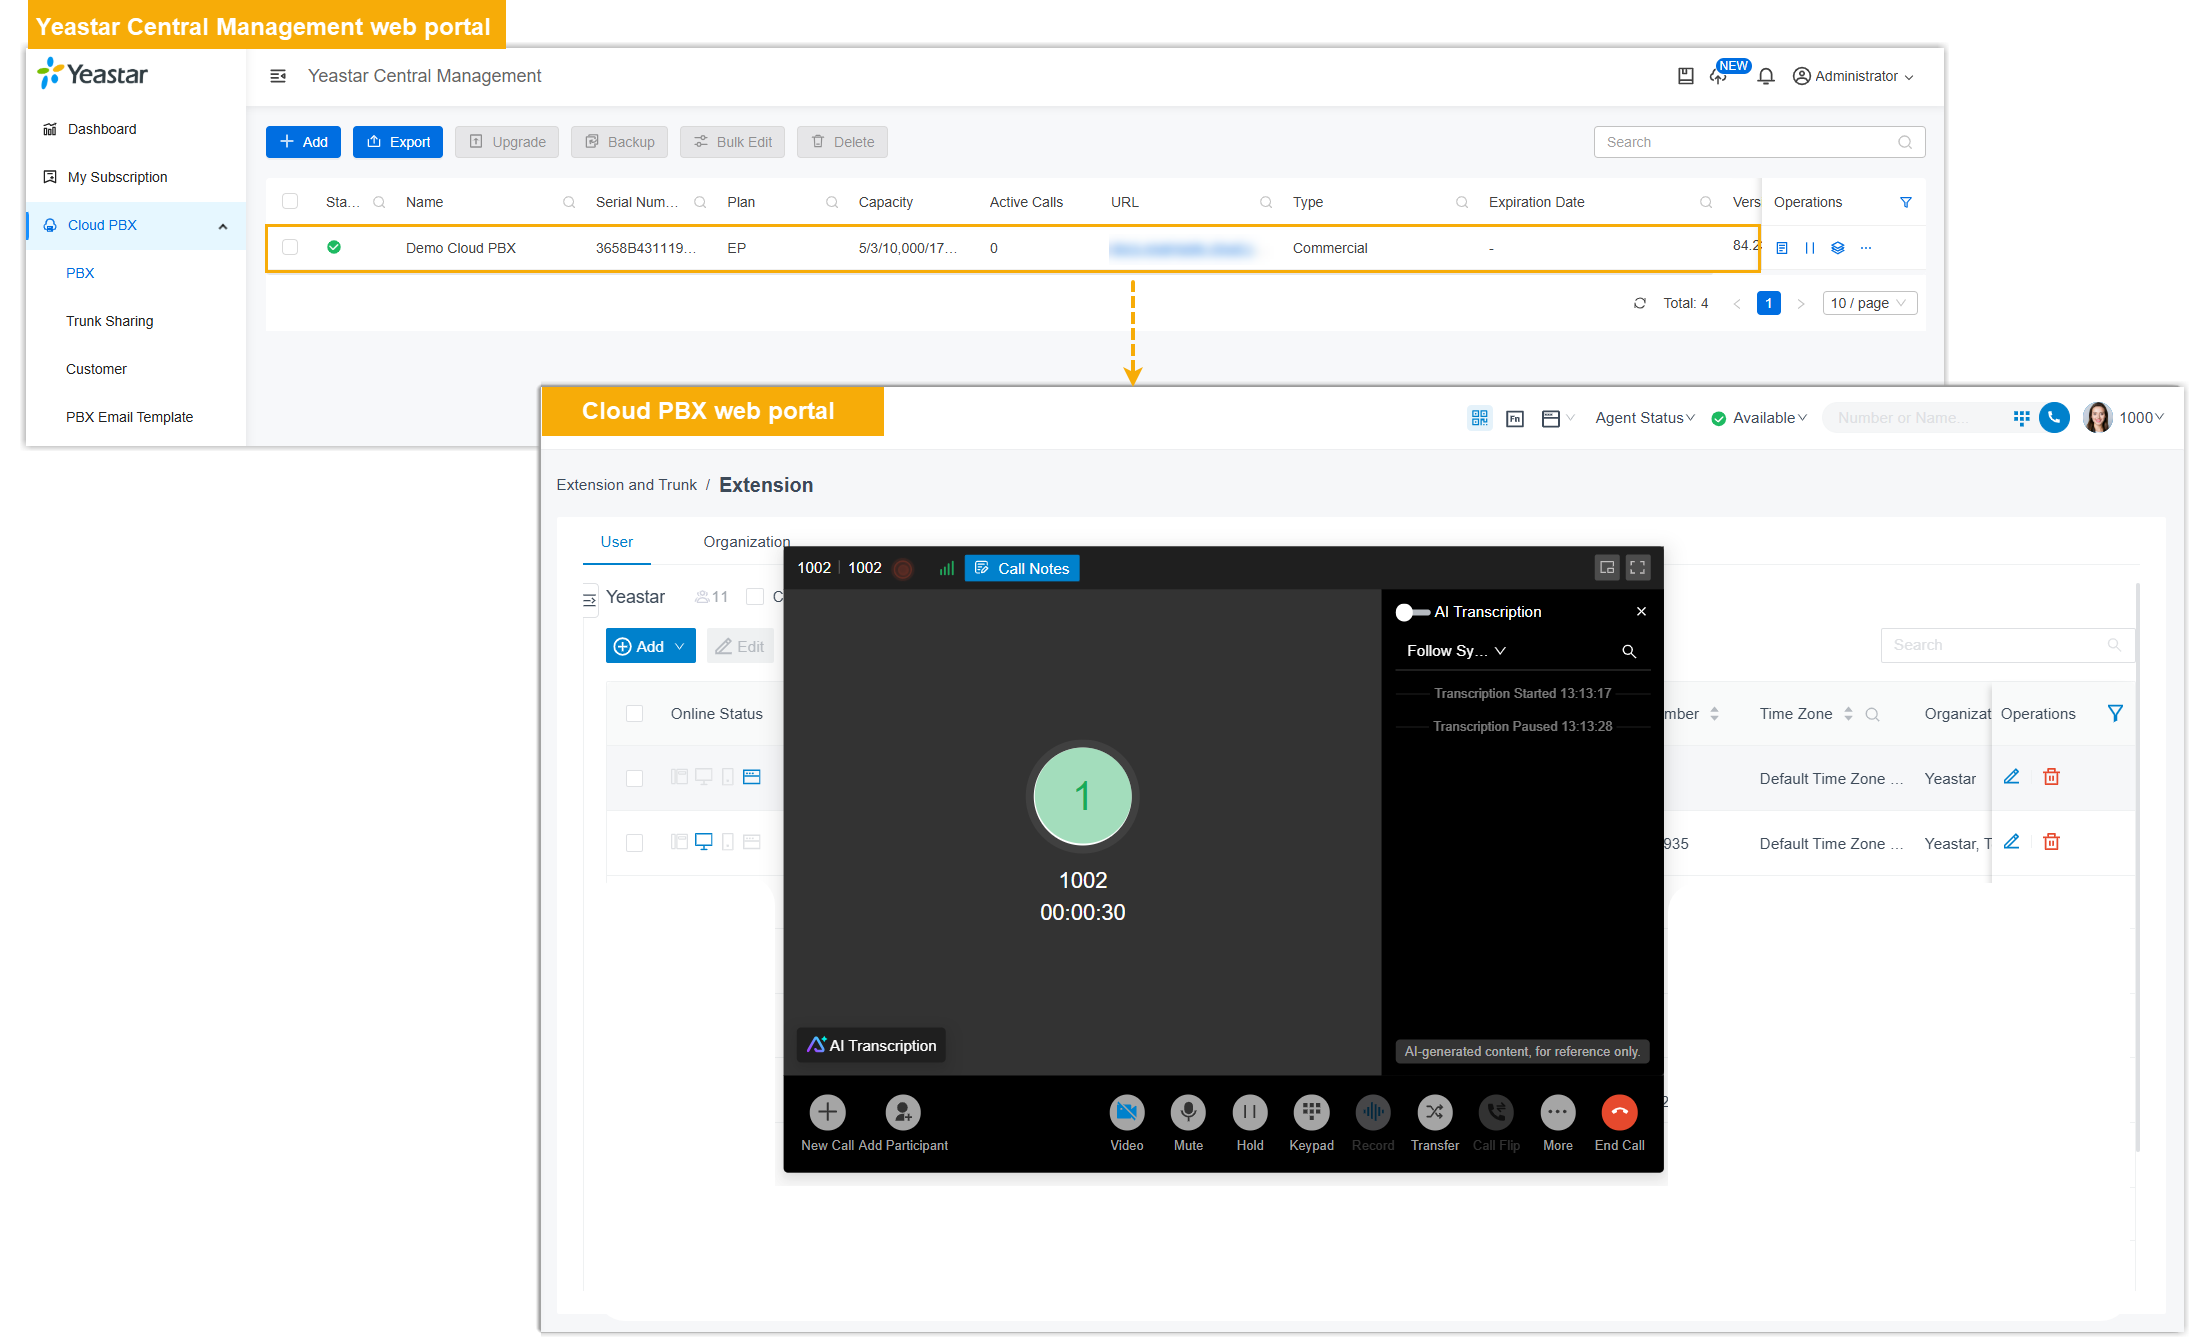
For more information, see Management Guide - Create a P-Series Cloud PBX.