Integrate Yeastar S-Series VoIP PBX with Microsoft Teams
This topic describes how to integrate Yeastar S-Series VoIP PBX with Microsoft Teams via Yeastar for Microsoft Teams App.
Overview
- Make and receive calls directly from the Teams App.
- Keep your existing phone numbers, SIP phones, and any SIP devices.
- Enjoy advanced PBX features including IVR, call queue, call routing, call recording, and so on.
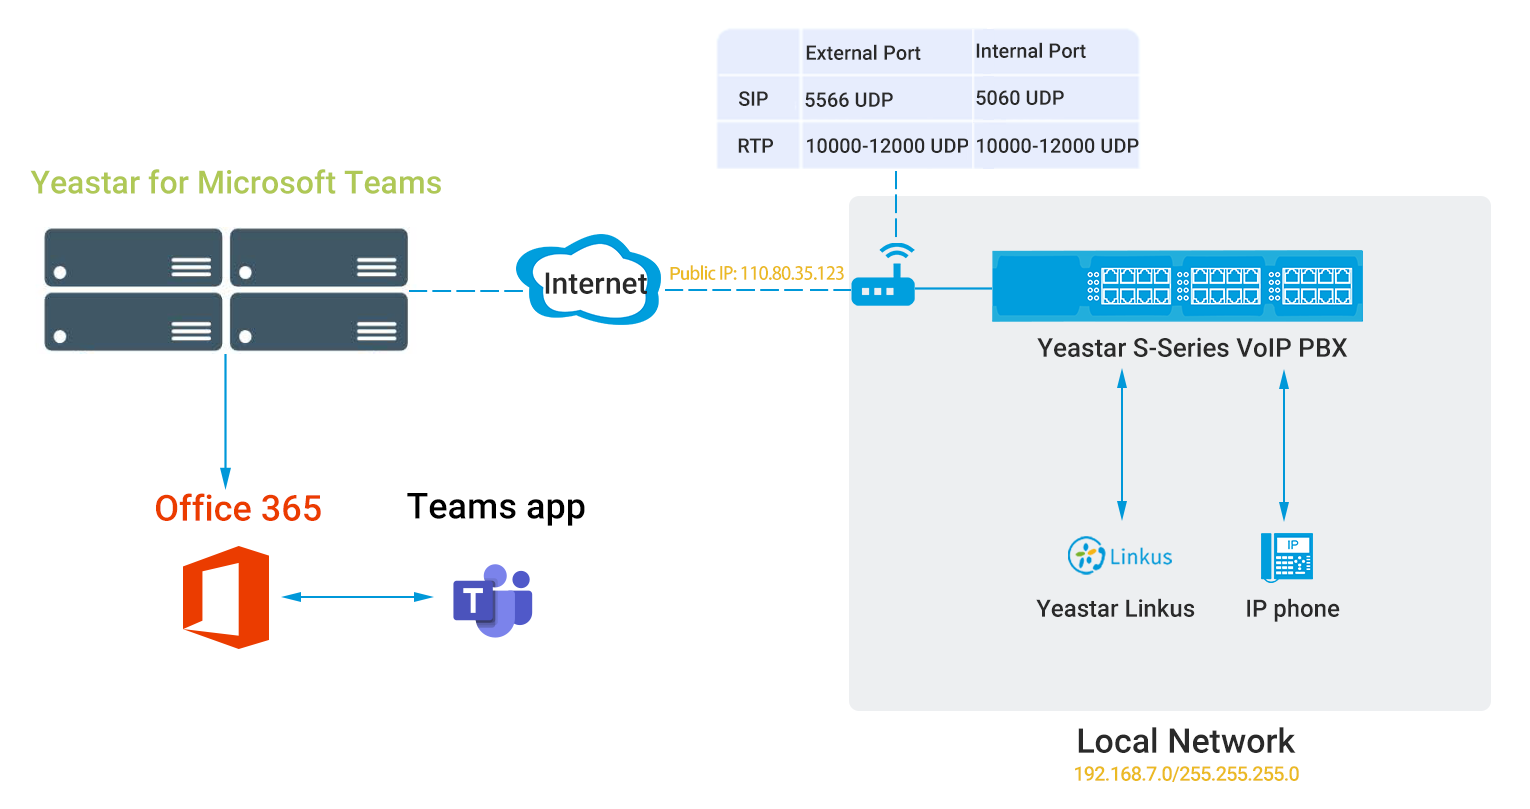
In this topic, we introduce the integration between Yeastar S-Series VoIP PBX and Microsoft Teams based on the following configurations:
- The Yeastar S-Series VoIP PBX is behind a router and has a public IP address 110.80.35.123.
- The Yeastar S-Series VoIP PBX is deployed in the local network 192.168.7.0/255.255.255.0.
Requirements
- Microsoft 365
-
- Get admin access to Microsoft 365 admin center.
- Your Microsoft service must meet the following requirements:
Microsoft 365 version Requirements Microsoft 365 Business Basic Any one of the followings is required:
- "Common Area Phone" license
- “Phone System" license
- "Microsoft 365 Business Voice" add-on
Note: Not all of them are available in all the countries, buy any one of them according to your country or region.Microsoft 365 Business Standard Microsoft 365 Business Premium Office 365 E1 Office 365 E3 Microsoft 365 E3 Office 365 E5 No additional requirements. Microsoft 365 E5
- Yeastar for Microsoft Teams App
- Contact Yeastar Sales to purchase and activate Yeastar for Microsoft Teams license.
- Yeastar S-Series VoIP PBX
- Get admin access to Yeastar S-Series VoIP PBX.
1. Configure Yeastar S-Series VoIP PBX
Step1. Configure port forwarding & NAT
To ensure that Microsoft Teams can communicate with Yeastar S-Series VoIP PBX, you need to forward relevant ports on your router and configure NAT on your PBX.
- Configure port forwarding on the router that is connected to your PBX.
- Log in to the PBX web interface, go to , check the SIP UDP port and RTP
ports.

- Log in to your router, forward the SIP UDP port and RTP
ports.
In this example, configure the port forwarding as follows:
Port External port Internal port SIP 5566 UDP 5060 UDP RTP 10000-12000 UDP 10000-12000 UDP
- Log in to the PBX web interface, go to , check the SIP UDP port and RTP
ports.
- Configure NAT on your PBX.
- Log in to the PBX web interface, go to , configure the NAT settings.

- NAT Type: Select a NAT type. In this example, choose External IP Address.
- External IP Address: Enter the public IP address and external SIP UDP port of your PBX. In this example, enter 110.80.35.123:5566.
- Local Network
Identification: Enter the local
network segment and the subnet mask. This setting
allows all your local devices to communicate with
the PBX by the local IP address instead of passing
through the router.Note: If you have multiple local network segments, click
 to add another Local
Network Identification.
 - NAT Mode: Choose Yes.
- Click Save and reboot the PBX to take effect.
- Log in to the PBX web interface, go to , configure the NAT settings.
Step2. Create a SIP extension
- Go to , click Add.
- On the Basic page, go to
General section, and set the general settings of
the extension.
- Type: Select the checkbox of SIP.
- Extension: Enter the extension number.
- Caller ID: Enter the caller ID number, which will be displayed on the callee's phone when the extension user makes an outgoing call.
- Registration Name: The name used to register the extension.
- Caller ID name: Enter the caller ID name, which will be displayed on the callee's phone when the extension user makes an outgoing call.
- Concurrent Registrations: Yeastar S-Series VoIP PBX supports to register one SIP extension number on multiple endpoints. When a call reaches the extension number, all endpoints will ring. The maximum number of concurrent registrations is 5.
- Registration Password: The password used to register the extension.
- Click Advanced tab, enable
Register Remotely, and disable
Qualify.

- Click Save and Apply.Note: The following SIP credentials are required when you configure users on the configuration portal.
- Extension number
- Registration name
- Registration password
2. Integrate Yeastar S-Series VoIP PBX and Microsoft Teams
Log in to the configuration portal by your Microsoft 365 admin account to integrate Yeastar S-Series VoIP PBX and Microsoft Teams.
Step1. Set up PBX service
- On the navigation bar, click Services tab.
- Click PBX to add a PBX.
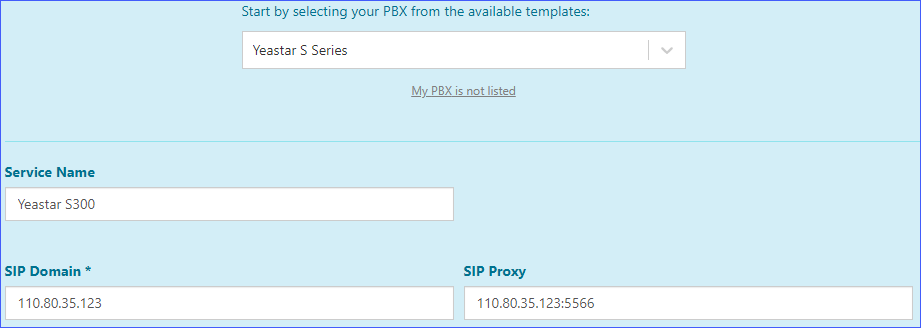
- Start by selecting your PBX from the available templates: In this example, choose Yeastar S Series.
- Service Name: Enter the device name to help you identify it.
- SIP Domain: Enter the public IP address of your PBX. In this example, enter 110.80.35.123
- SIP Proxy: Enter the public IP address and external SIP port of your PBX. In this example, enter 110.80.35.123:5566.
- Click Add PBX.
A green checkmark prompting "Service successfully enabled" appears.
Step2. Synchronize Yeastar S-Series VoIP PBX with Microsoft 365
- On the Services page, click Teams tab.
- In the Sync Disabled column, click Enable Sync.
- In the pop-up window, select your Microsoft 365 admin account.
A window pops up, which indicates that the configuration portal is trying to connect to your Microsoft 365 admin account.

When the window closes, Yeastar S-Series VoIP PBX will automatically synchronize with your Microsoft 365.
Step3. Associate Microsoft Teams users with SIP extensions
To ensure that users can make and receive calls on Microsoft Teams using the PBX phone service, you need to associate Microsoft Teams users with SIP extensions as follows:
- On the navigation bar, click Users tab.
- On the Services page, click +Add
User to add a user.
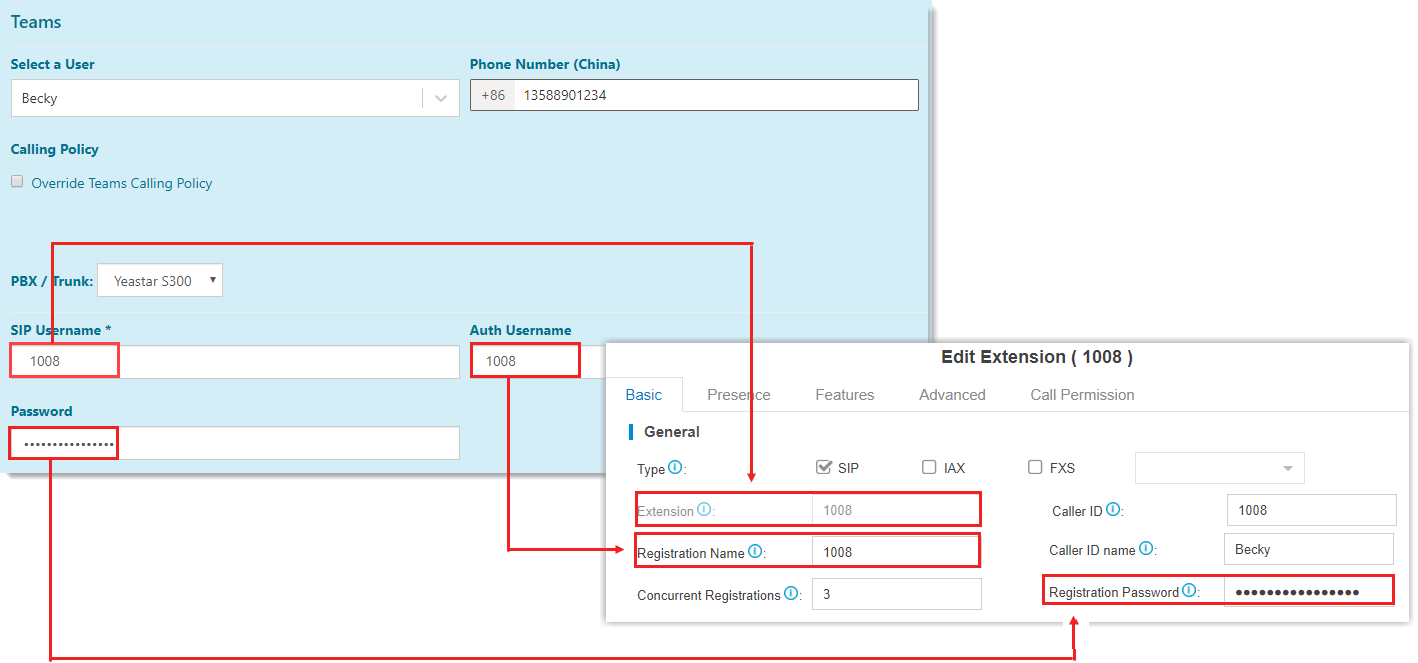
- Select a User: Select a Teams user
from the drop-down list.Note: Make sure the selected user has the required licenses of both Microsoft and Yeastar for Microsoft Teams, or the user can NOT make or receive calls.
- Phone Number: Set the user's phone number.
- PBX/Trunk: Choose the PBX on which you create the SIP extension that will be associated with the user.
- SIP Username: Enter the extension's Extension.
- Auth Username: Enter the extension's Registration Name.
- Password: Enter the extension's Registration password.
- Select a User: Select a Teams user
from the drop-down list.
- Click Add.
A green checkmark prompting "Service user successfully enabled" appears.
If the user is successfully associated with the PBX, the Registration status shows
 .
.
- If you want to add more users, click Add User and repeat step 2-3.
- Click Sync Now, so that the user information can be synchronized to your Microsoft 365.
Result
After integrating Yeastar S-Series VoIP PBX with Microsoft Teams, Teams users can make or receive internal calls with the PBX extensions.
- To allow Teams users to make outbound calls through PBX's trunk, you need to configure dial plans in Microsoft Teams.
- To allow Team users to receive inbound calls through PBX's trunk, you need to make sure at least an inbound route is configured to reach the extensions that are associated with the Team users.
Configure Dial Plans in Microsoft Teams
Background information
Microsoft Teams generates a dial plan rule named "Call2Teams" after you integrate Yeastar S-Series VoIP PBX with Microsoft Teams. The default rule with the pattern ^(\*[\*\d]+|[1-9]\d{0,5})$ only allows Teams users to dial numbers with maximum 6 digits, and start with digit 1-9.

Procedure
To allow Teams users to make outbound calls to any numbers, you need to set up a normalization rule, and move the rule to the top as follows.
- Log in to Microsoft Teams admin center.
- In the left navigation bar, click .
- Click the default dial plan Global (Org-wide default).
- In the Normalization rules section, click +Add to add a dial plan rule.
- On the Add new rule page, set the rule.
- In the Name field, set a name for the rule.
- In the Description field, add a note to the rule.
- Select Advanced.
- Go to The number dialed matches this regular
expression field in the If
condition section, enter ^(\d*)$.
Teams users can make outbound calls to any numbers.
- Go to Translate the number based on this regular expression field in the Then do this section, enter $1, which means that no translation, Microsoft Teams will send the dialed numbers out without any modification.
- Go to Enter a phone number to test in Test this rule section, enter a phone number and click Test to test if the number matches the pattern.
- Click Save.
- Change the rule's priority.Note: Microsoft Teams traverses the list of normalization rules from the top down, and uses the first rule that matches the dialed number. Move the rule to the top, or users may fail to call out.
- In the
 column, click the
desired rule.
 - On the menu bar, click Move up to
move the rule to the top.

- In the
Result
Teams users can dial external numbers according to the dial pattern of PBX's outbound route.
Example:

As the above figure shows, the outbound route requires users to add prefix 9 before the dialed number, and the prefix will be stripped before PBX sends the call out.
To call 15880123489, Teams users should dial 915880123489.
Test phone calls on Microsoft Teams
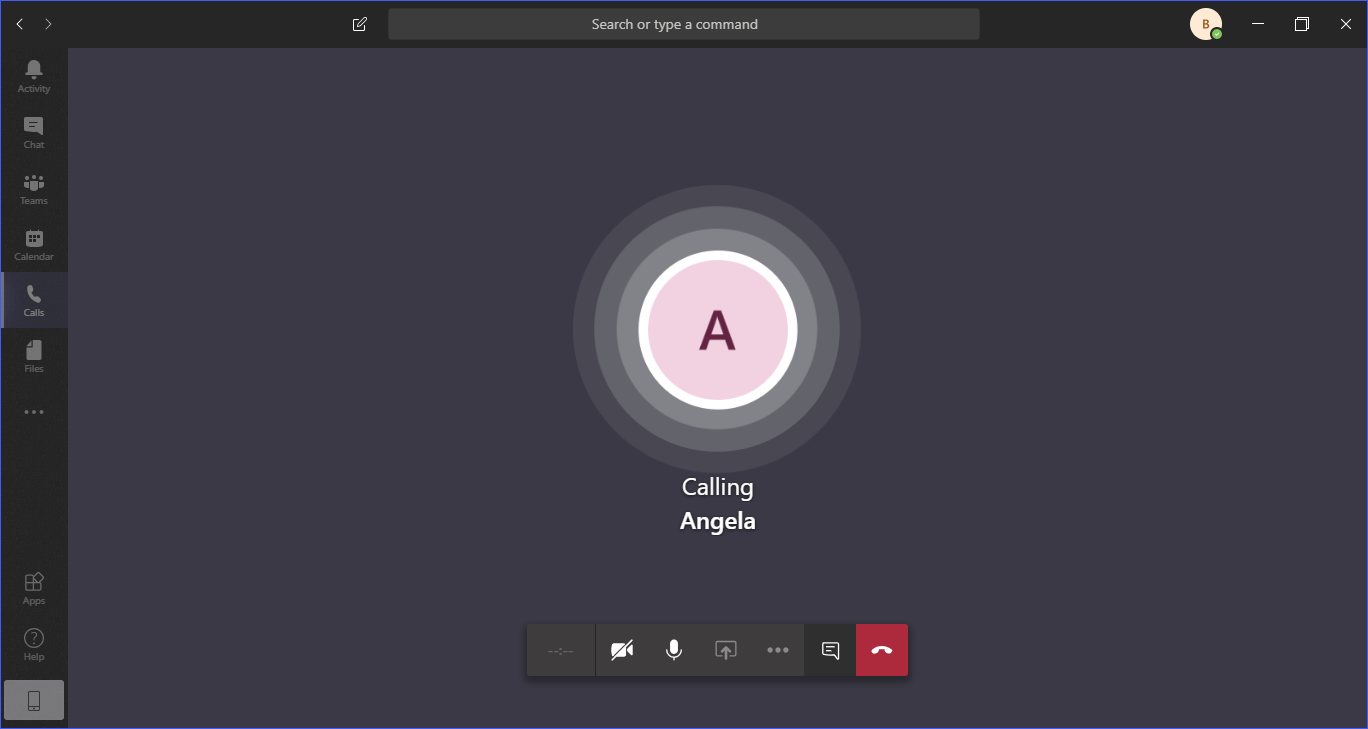
Make a call
- On the left navigation bar, click Calls.
- Click Dial a number.
- On the dialpad, enter the desired number.
- Click Call.
Receive a call
When a call reaches a user's extension number, the user will receive a pop-up notification of an incoming call, and he/she can decide whether to answer the call or not.
