S412 Lite Overview
Front Panel
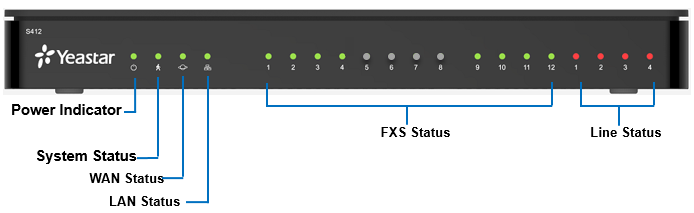
| LED | Indication | Status | Description |
|---|---|---|---|
| POWER | Power status | On | The power is switched on. |
| Off | The power is switched off. | ||
| SYSTEM | System status | Blinking | The system is running properly. |
| Static/Off | The system goes wrong. | ||
| WAN | WAN status | Static | Linked normally. |
| Blinking | In communication. | ||
| Off | Off-line. | ||
| LAN | LAN status | Static | Linked normally. |
| Blinking | In communication. | ||
| Off | Off-line. | ||
| 1-12 (FXS status) Troubleshooting: Why indicators 5-8 do not work?
|
FXS | Green: static | The analog phone is idle. |
| Green: blinking | The analog phone is busy. | ||
| 1-4 (Line status) |
GSM/3G/4G | Red: static | The GSM/3G/4G Trunk is idle. |
| Red: blinking slowly | No SIM card. | ||
| Red: blinking rapidly | The GSM/3G/4G trunk is in use. | ||
| BRI | Orange: blinking | The BRI line is disconnected. | |
| Orange: static | The BRI line is connected or in use. | ||
| FXO | Red: static | The PSTN line is idle. | |
| Red: blinking slowly | No PSTN line is connected to the FXO port. | ||
| Red: blinking rapidly | The PSTN line is busy. |
Rear Panel
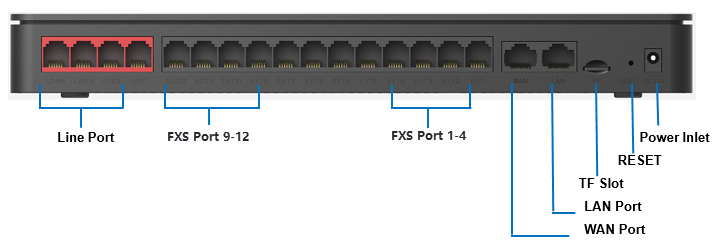
| Port | Description |
|---|---|
|
Line port |
Note: The sequence number of the ports corresponds to the
indicators in the front panel.
|
| FXS port |
Note:
|
| WAN/LAN |
Yeastar S412 Lite provides two 10/100Mbps adaptive RJ45 Ethernet ports, and supports 3 Ethernet modes. The default mode is “Single”.
|
| TF Slot | Insert TF card to store auto recording files. |
| Reset Button | Press and hold for 10 seconds to restore the factory defaults. |
| Power Inlet | Connect the supplied power supply to the port. |