How to allow notifications from Linkus Web Client on web browser?
If you ignore or decline the request for notification when first logging in to Linkus Web Client, you will NOT receive any notifications from Linkus Web Client.
To receive notifications when there are incoming calls, you need to allow notifications from Linkus Web Client.
Refer to the following instructions based on your web browser to allow the notifications.
- Google Chrome
-
- If you haven't dealt with the request from Linkus Web Client for
notification, you can do as follows:
- Log in to Linkus Web Client.
- Allow Linkus Web Client to send notifications.
- In the address bar of Google Chrome, click
 or
or  .
. - In the pop-up window, click Site
settings.
You are redirected to configuration page of Google Chrome.
- Scroll down and go to .
- In the drop-down list of Notifications, select Allow.
- In the address bar of Google Chrome, click
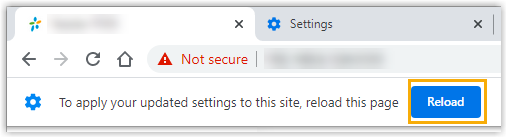
- Apply the change to Linkus Web Client.
- Click the tab of Linkus Web Client.
- On the top of Linkus Web Client, click
Reload.
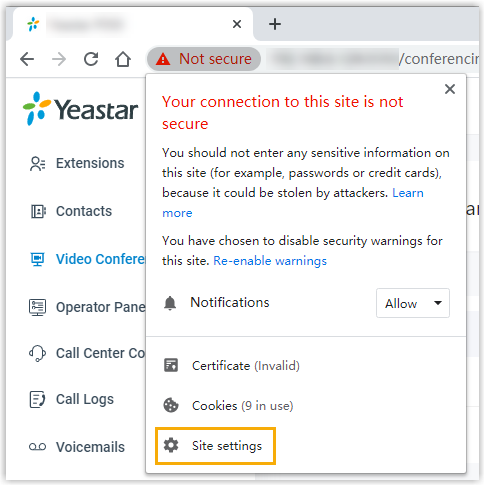
- If you have blocked Linkus Web Client from sending notifications,
you can do as follows:
- Log in to Linkus Web Client.
- Allow Linkus Web Client to send notifications.
- In the address bar of Google Chrome, click
or .
- In the drop-down list of
Notifications, select
Allow.

- Click any blank space to confirm.
- In the address bar of Google Chrome, click
- Apply the change to Linkus Web Client.
- On Linkus Web Client, click
Reload.
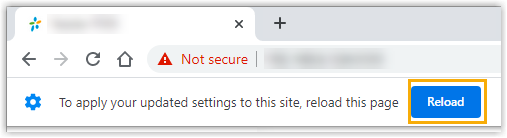
- On Linkus Web Client, click
Reload.
- If you haven't dealt with the request from Linkus Web Client for
notification, you can do as follows:
- Microsoft Edge
-
- If you haven't dealt with the request from Linkus Web Client for
notification, you can do as follows:
- Log in to Linkus Web Client.
- Allow Linkus Web Client to send notifications.
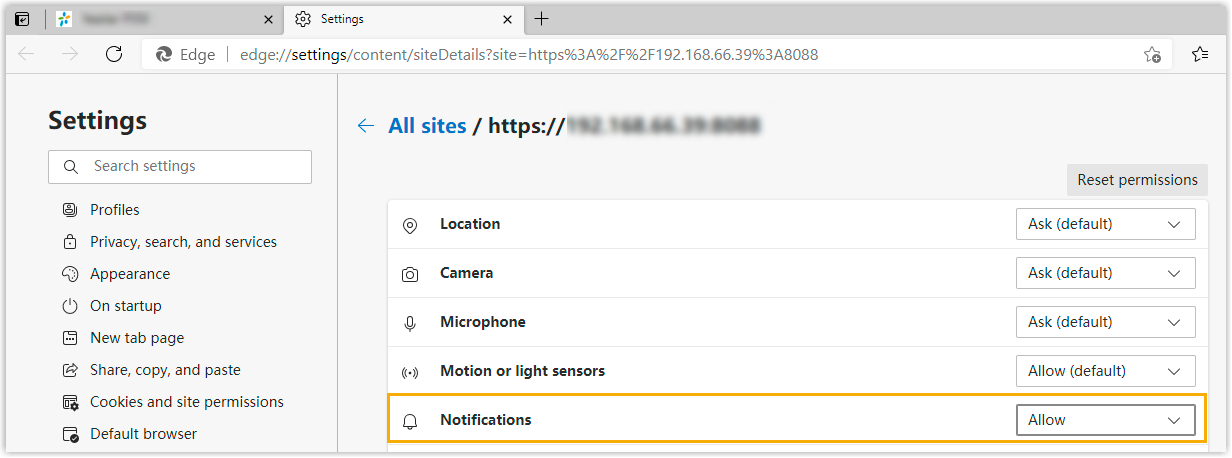
- In the address bar, click or .
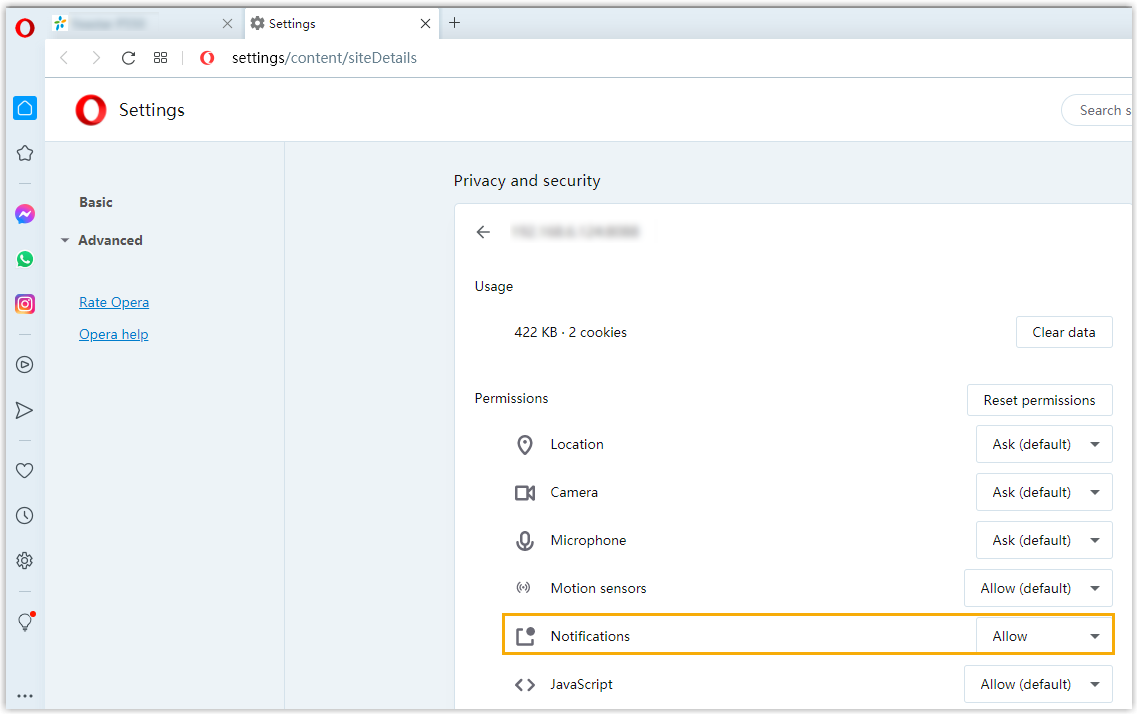
- Select Permissions for this
site from the drop-down list.
You are redirected to the web browser's Settings page.
- In the drop-down list of
Notifications, select
Allow.
- In the address bar, click
- Apply the change to Linkus Web Client.
- Click the tab of Linkus Web Client.
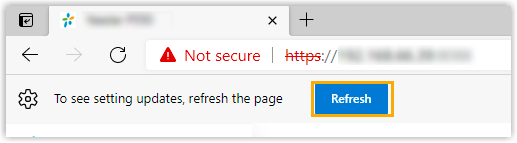
- On the top of Linkus Web Client, click
Refresh.

- If you have blocked Linkus Web Client from sending notifications,
you can do as follows:
- Log in to Linkus Web Client.
- Allow Linkus Web Client to send notifications.
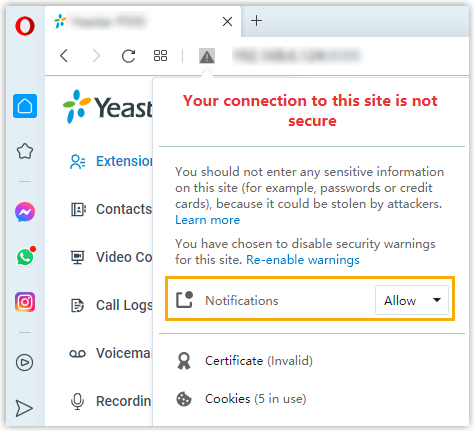
- In the address bar, click or .
- In the drop-down list of
Notifications, select
Allow.

- Click any blank space to confirm.
- In the address bar, click
- Apply the change to Linkus Web Client.
- On Linkus Web Client, click
Refresh.
- On Linkus Web Client, click
Refresh.
- If you haven't dealt with the request from Linkus Web Client for
notification, you can do as follows:
- Opera
-
- If you haven't dealt with the request from Linkus Web Client for
notification, you can do as follows:
- Log in to Linkus Web Client.
- Allow Linkus Web Client to send notifications.
- In the address bar, click
 or .
or . - In the pop-up window, click Site
settings.
You are redirected to configuration page of Opera.
- In the drop-down list of
Notifications, select
Allow.
- In the address bar, click
- Apply the change to Linkus Web Client.
- Click the tab of Linkus Web Client.
- On the top of Linkus Web Client, click
Reload.

- If you have blocked Linkus Web Client from sending notifications,
you can do as follows:
- Log in to Linkus Web Client.
- Allow Linkus Web Client to send notifications.
- In the address bar of Opera, click or .
- In the drop-down list of
Notifications, select
Allow.
- Click any blank space to confirm.
- In the address bar of Opera, click
- Apply the change to Linkus Web Client.
- On the top of Linkus Web Client, click
Reload.

- On the top of Linkus Web Client, click
Reload.
- If you haven't dealt with the request from Linkus Web Client for
notification, you can do as follows: