Connect Yeastar K2 IPPBX to OpenVPN Server
You can connect Yeastar K2 IPPBX to the OpenVPN server by manual configuration or OpenVPN files package.
- Manual Configuration: If your VPN provider provides you the with information of OpenVPN server settings, certification files and key files, you can manually configure the OpenVPN client on Yeastar K2 IPPBX and connect to OpenVPN Server.
-
Upload OpenVPN Package: If your VPN provider provides you with a connection file, certification files and key files, you can compress these files, upload the package to Yeastar K2 IPPBX and connect to OpenVPN Server.Note:
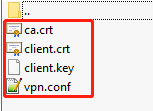
- The name of OpenVPN connection file should be vpn.conf.
- You need to save the certification files and key files in
the root directory, and compress them into a
.tar package.
-
The new option
remote-cert-tls serveris not supported on the Yeastar K2 IPPBX, you need to change it tons-cert-tls server.
Manual Configuration on Yeastar K2 IPPBX
- Go to , select the checkbox of Enable OpenVPN.
- In the drop-down list of Type, select Manual Configuration.
- Set the OpenVPN client settings according to the OpenVPN server.
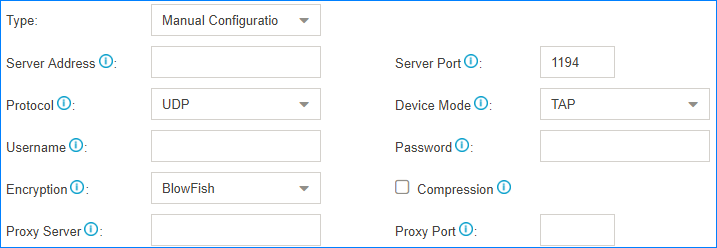
- Server Address: Enter the IP address of the OpenVPN server.
- Server Port: Enter the port of the OpenVPN server.
- Protocol: Select the same protocol as the OpenVPN server.
- Device Mode: Select the same mode as the OpenVPN server.
- Username: Optional. Enter the username to access the VPN server.
- Password: Optional. Enter the username to access the VPN server.
- Encryption: Select the same type as the OpenVPN server.
- Compression: Enable or disable compression for data stream. The server and client should be the same setting.
- Proxy Server: If the PBX is connected through an HTTP proxy to reach the OpenVPN server, enter the proxy server.
- Proxy Port: If the PBX is connected through an HTTP proxy to reach the OpenVPN server, enter the proxy port.
- Upload certificates and keys.

- CA Cert: Upload a CA certificate.
- Cert: Upload a Client certificate.
- Key: Upload a Client key.
- TLS Authentication: Enable or disable TLS authentication.
- TA Key: If you enable TLS Authentication, upload a TA key.
- Click Save and click the
 at the right-top corner to check the VPN client
status.
at the right-top corner to check the VPN client
status.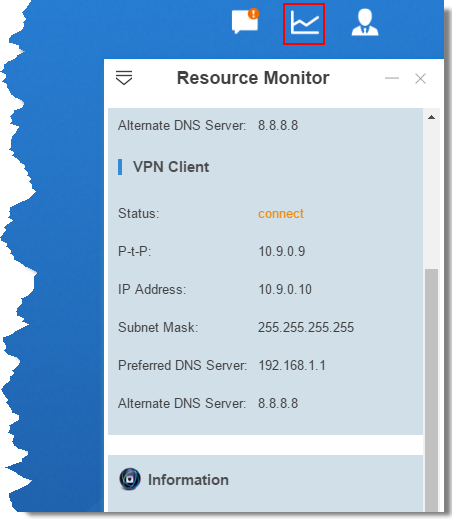
Upload OpenVPN Package
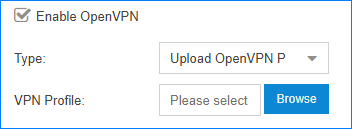
- Go to , select the checkbox of Enable OpenVPN.
- In the drop-down list of Type, select Upload OpenVPN Package.
- Click Browse, select the OpenVPN package.
- Click Save and click the at the right-top corner to check the
VPN client status.