Set up an IVR
Set up your own IVR if you need to routing incoming calls via an auto attendant.
- Go to , click Add to add an IVR or edit the default IVR.
-
Edit the Basic settings of the IVR.
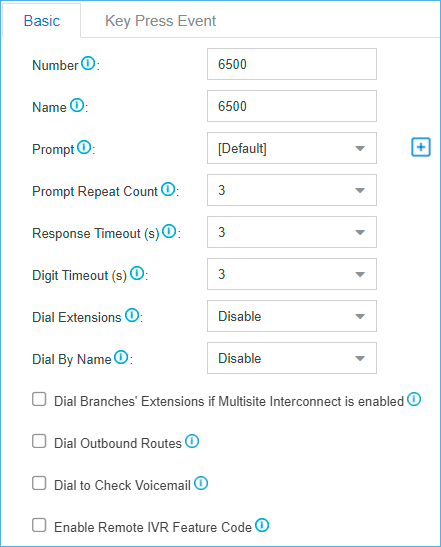
- Number: PBX treats IVR as an extension; you can dial this extension number to reach the IVR from internal extensions.
- Name: Set a name for the IVR.
- Prompt: Use the default IVR prompt or select your custom IVR prompt.
- Prompt Repeat Count: Set how many times the prompt will be played.
- Response Timeout: Set how long the PBX will wait for the caller to operate.
- Digit Timeout: After the user enters a digit, the user needs to enter the next digit within the timeout.
- Dial Extensions: Whether to allow callers to dial
extension numbers via IVR.
- Disable: All the extensions can NOT be reached via the IVR.
- Allow All Extensions: All the extensions are allowed to be reached via the IVR.
- Allowed Extensions: Only the extensions in the Selected box can be reached via the IVR.
- Restricted Extensions: The extensions in the Selected box can NOT be reached via the IVR.
- Dial
By Name: Whether to allow callers to dial by name via the IVR.
- Disable: All the extensions can NOT be dialed by name via the IVR.
- Allow All Extensions: All the extensions are allowed to be dialed by name via the IVR.
- Allowed Extensions: Only the extensions in the Selected box can be dialed by name via the IVR.
- Restricted Extensions: The extensions in the Selected box can NOT be dialed by name via the IVR.
Note:- The Dial by Name in the Key Press destinations is only available when the Dial By Name in the Basic page is enabled.
- If
you change the Dial By Name
feature to Disable in the
Basic page when the Key Press
destination has been set to Dial by
Name, the Keypress destination will be
restored to the
default
null
option.
- Dial Branches' Extensions if Multisite Interconnect is enabled: If you check this option, when the PBX is connected to other PBX systems via Multisite Interconnect feature, callers can directly call to the extensions that are connected to other PBX systems.
- Dial Outbound Routes: Whether to allow callers to
dial outbound calls via IVR.Note: This option is useful if you interconnect two PBXs. The callers can dial the other PBX's extension number via the IVR. In this solution, you need to configure the appropriate outbound route and inbound route in both of the two connected PBXs.
- Dial to Check Voicemail: Whether to allow users
to check voicemail via IVR.Note: This option is for the users who work out of the office. They can call in the PBX and check their voicemail messages via the IVR.
- Enable Remote IVR Feature Code: Whether to allow
users to dial in IVR, enter remote IVR feature code (#9) and the password to
replace the voice prompt of IVR.Note: If IVR prompt is replaced successfully, the previous voice prompts will be removed, and only the new voice prompt will be retained.
-
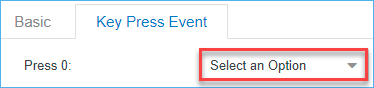
Click Key Press Event tab, set the destination based on
callers' key presses.
The following Key Press destinations are supported:
- Hang up
- Extension
- Voicemail
- IVR
- Ring Group
- Queue
- Conference
- External Number
- DISA
- Callback
- Fax to Email
- Dial by Name
- Custom Prompt
-
On the Key Press Event page, set the
Timeout destination and the Invalid
Destination.

- Timeout: If callers do not make an entry within the Prompt Repeat Count, they will be transferred to the Timeout destination.
- Invalid: If callers enter a digit that is not defined in the IVR, they will be transferred to the Invalid destination.
- Click Save and Apply.