LDAP Configurations on Fanvil Phone
In this example, we demonstrate how to configure and use LDAP phonebook using a Fanvil X5S (version 1.12.1).
Configuration Example
The example configurations are set according to default settings of Yeastar K2 IPPBX LDAP server. You can use the following settings as a starting point and adjust the filter and display attributes according to your needs.
Log in the Fanvil phone web interface, go to to configure LDAP client.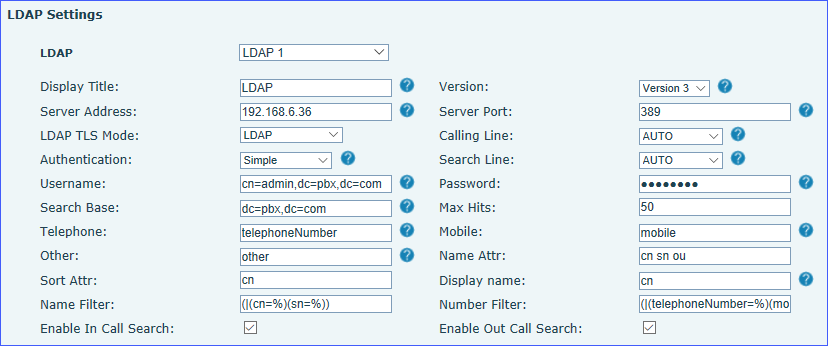
| Setting | Description | Example |
|---|---|---|
| LDAP | Choose one of the following phonebooks.
|
LDAP 1 |
| Display Title | Specify the name of phonebook. | LDAP |
| Version | Yeastar K2 IPPBX LDAP server uses Version 3. | Version3 |
| Server Address | Enter the IP address of PBX. | 192.168.6.36 |
| Server Port | Enter the LDAP server port. | 389 |
| LDAP TLS Mode | Specify the connection mode between the LDAP server and the
IP phone.
|
LDAP |
| Calling Line | Select a dialing line that LDAP uses. When a call is initiated from the specified line, contacts information is searched in the LDAP phonebook of the corresponding line. If no contacts information is found, contacts information is searched in LDAP phonebooks configured as AUTO. | AUTO |
| Authentication | Select authentication type to access to LDAP server.
|
Simple |
| Search Line | Select an answering line that LDAP uses. When a call is received from the specified line, contacts information is searched in the LDAP phonebook of the corresponding line. If no contacts information is found, contacts information is searched in LDAP phonebooks configured as AUTO. | AUTO |
| Username | Enter the user name to log in the LDAP server. | cn=admin,dc=pbx,dc=com |
| Password | Enter the password to log in the LDAP server. | password |
| Search Base | Specify a starting point in the directory tree from which to
search.
|
dc=pbx,dc=com |
| Max Hits | Specify the maximum number of search results to be returned by the LDAP server. | 50 |
| Telephone | Specify the telephoneNumber attributes of each record to be returned by the LDAP server. | telephoneNumber |
| Mobile | Specify the mobileNumber attributes of each record to be returned by the LDAP server. | mobile |
| Other | Specify the other attributes of each record to be returned by the LDAP server. | other |
| Name Attr | Specify the name attributes of each record to be returned by the LDAP server. You can configure multiple name attributes separated by space. | cn sn ou |
| Sort Attr | Specify the mode of sorting the query results. | cn |
| Display name | Specify the display name of the contact record displayed on the LCD screen. | cn |
| Name Filter |
Specify the name attributes for LDAP searching.
|
(|(cn=%)(sn=%)) |
| Number Filter |
Specify the number attributes for LDAP searching.
|
(|(telephoneNumber=%)(mobile=%)(other=%)) |
| Enable in Call Search | Enable or disable IP phone to perform LDAP search when receiving an incoming call. | Enabled |
| Enable Out Call Search | Enable or disable IP phone to perform LDAP search when placing an outgoing call. | Enabled |
Set an LDAP Key
Set an LDAP key on Fanvil phone to quickly access the LDAP phonebook.
- Log in the Fanvil phone web interface, go to Function Key.
- Choose a DSS key, select key type to Key Event and
subtype to LDAP Group.
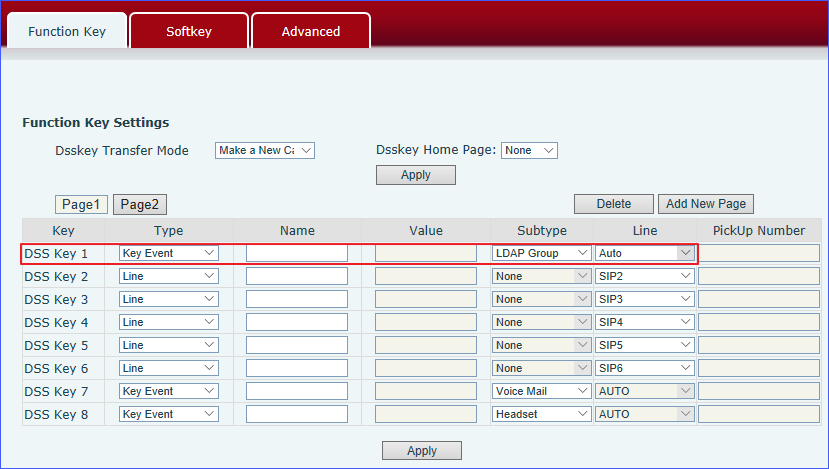
- Click Apply.
Search LDAP Contacts
You can press the LDAP key to access the LDAP phonebook. Enter the search criteria to search a contact from LDAP phonebook and call the contact.
- Press the LDAP key to access the LDAP phonebook.
- Press Search to search the contact name or number using the keypad.
The contacts whose name or phone number match the characters entered will
appear on the LCD screen.
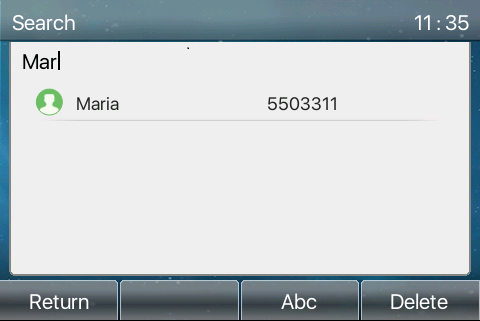
- Press the navigation key to select the desired contact.
- Press Dial to call the contact.