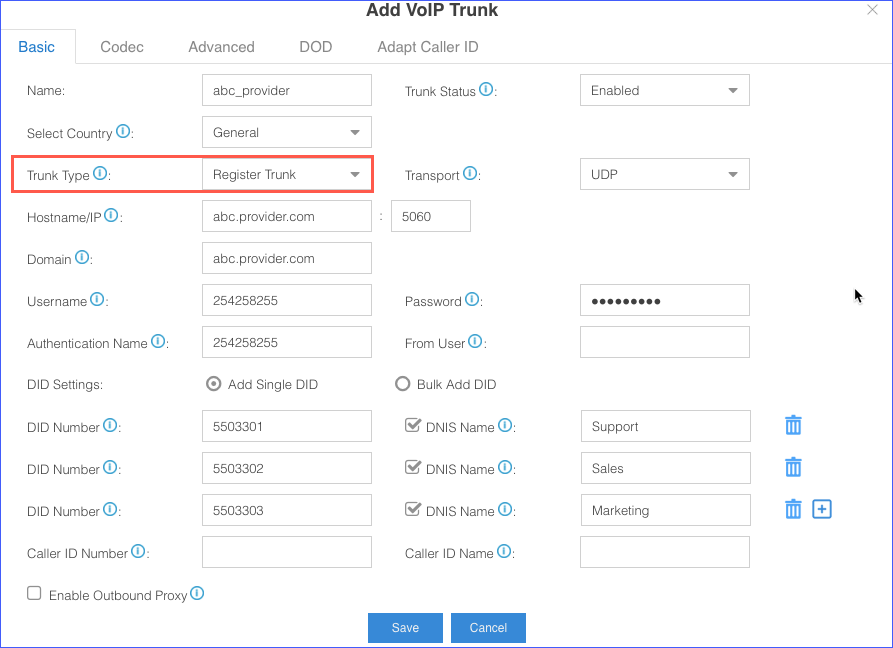
Create a VoIP Register Trunk - General
If your VoIP provider is not included in the supported VoIP provider list, and you have got a VoIP account with user name and password, you can set up a Register Trunk on Yeastar Cloud PBX.
Assume that you bought a SIP trunk from the VoIP provider, and the trunk information is displayed as below. We will introduce how to set up a Register Trunk according to the trunk information.
| Provider address | abc.provider.com |
| Protocol | SIP |
| SIP Port | 5060 |
| Transport | UDP |
| Username | 254258255 |
| Authenticate name | 254258255 |
| Password | 05JsOmsIS54SYh |
| Provided DID numbers | 5503301 / 5503302 / 5503303 |
- Go to , click Add.
- In the Name field, enter a trunk name.
- In the Select Country drop-down list, select General.
- In the Trunk Type drop-down list, select Register Trunk.
- Enter the trunk information that is provided by the VoIP provider:
- Hostname/IP: Enter the IP address or the domain of the VoIP provider (e.g.,abc.provider.com).
- Domain: Enter the IP address or the domain of the VoIP provider (e.g., abc.provider.com).
- Username: Enter the username to register to the VoIP provider (e.g., 254258255).
- Password: Enter the password that is associated with the username (e.g., 05JsOmsIS54SYh).
- Authentication Name: Enter the authentication name to register to the VoIP provider (e.g., 254258255).
- From User: Enter the same name as User Name (e.g., 254258255).
- Set DID numbers for the trunk:
- Select Add Single DID.
- Enter the DID Numbers which is provided by the VoIP provider.
- Select the checkbox of DNIS
Name, enter a DNIS name for the DID number.
When users call the DID number, the DNIS name will be displayed on ringing phone.
- Click
 to add another DID numbers.
- Configure other VoIP trunk settings as your need.
- Click Save and Apply.
You can check the trunk status in PBX Monitor. If the trunk status shows
 , the trunk is ready for use.