Step1. Connect Yeastar Cloud PBX and
- On Yeastar Cloud PBX, create an Account Trunk.
- Go to , click Add.
- Set the trunk as an Account trunk.
- Name: Set a name to help you identify it.
- Trunk Status: Choose Enabled.
- Protocol: Choose SIP.
- Trunk Type: Choose Account Trunk.
- Transport: Choose UDP.
- Username: Use the default or change the number.
- Password: Use the default or change the password.
- Authentication Name: Set to the same as the Username.
- Click Save and Apply.
- On Yeastar , create
a Register Trunk.
- Go to , click Add.
- Set the trunk to a Register trunk.
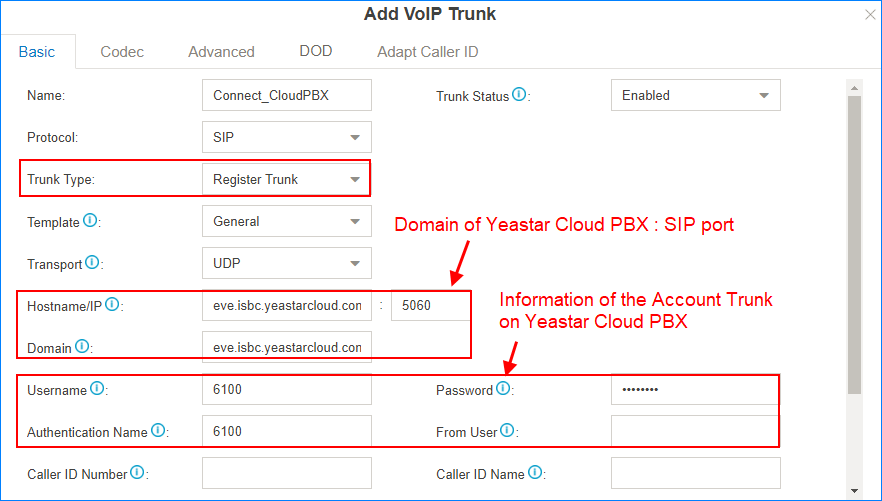
- Name: Set a name to help you identify it.
- Trunk Status: Enabled.
- Protocol: SIP.
- Trunk Type: Register Trunk.
- Template: General
- Transport: UDP
- Hostname/IP: Enter the domain or IP address of the Yeastar Cloud PBX, and SIP port of Yeastar Cloud PBX.
- Domain: Enter the domain or IP address of the Yeastar Cloud PBX.
- Username: Enter the Username of Account Trunk that is created on Yeastar Cloud PBX.
- Password: Enter the Password of Account Trunk that is created on Yeastar Cloud PBX.
- Authentication Name: Enter the Authentication Name of Account Trunk that is created on Yeastar Cloud PBX.
- Click Save and Apply.
- Check the connection status.
- On the Yeastar , go to PBX Monitor to check the
trunk status. If the connection is successful, the status
will show
 .
.
- On the Yeastar Cloud PBX, go to PBX Monitor to
check the trunk status.If the connection is successful, the
status will show .
- On the Yeastar , go to PBX Monitor to check the
trunk status. If the connection is successful, the status
will show