Auto Provision Phone Lines
You can auto provision your phones to make the phones register PBX extensions automatically.
Important: For the first time to auto provision your phones
on the PBX, you need to RESET all your phones before auto provisioning,
or auto provisioning may not work.
-
Go to , click Add or click Bulk
Add.
Note: You can only bulk provision phones that are in the same phone model.
-
On the configuration page, select the phone manufacturer, phone model, and
enter phone's MAC address.

-
Select a customized template.
The global settings will apply to the phone(s).
-
In the Account section, activate a line and assign an
extension for the phone.

- Click Features, Preference, or Codec tab to configure the settings.
-
Click Save and reboot the phone.
When the phone restarts, the phone user needs to fill in the user name and password to get the configurations from PBX.
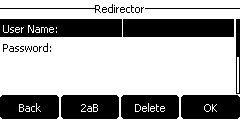
- User Name: Enter the extension number that is assigned to the phone.
- Password: Enter the extension's Voicemail Access
PIN.Tip:
- For the phone with small screen, you need to press the down key ▼ to find the password box.
- If the authentication page disappears from the phone screen, reboot the phone again to get the authentication page.
- You can send welcome emails that contain the voicemail access PIN to the users, then the users can log in the phone manually. If you export the device settings, you can check all the extensions' voicemail access PIN.