Getting Started with
P-Series PBX System
Set up your PBX system and run business communication on Yeastar P-Series PBX system with our step-by-step tutorial.
Welcome to Getting Started Tutorial
This tutorial walks you through the procedures to quick plan and implement a Uifined Communication solution based on a simple application scenario.

Objectives
1Understand the basic concepts
2Get Your PBX System Ready to Use
3Build Internal Communication in Your Company
4Build Communication with the Outside World
Get started!
![]() OBJECTIVES
OBJECTIVES
Understand Basic Concepts
Get Your System Ready to Use Configure the PBX to Your Local Area Network Complete Initial System Setup in the Installation Wizard
Build Internal Communication in Your Company Assign Extensions for Employees Set up Phones for Employees
Build External Communication with the Outside World Connect PBX System to an Internet Telephony Service Provider (ITSP) Make Outbound Calls to Your Customers Receive Incoming Calls from Your Customers
Understand Basic Concepts
A phone system begins with three basic components: PBX, endpoints, and trunks.
![]() PBX system
A PBX system manages internal calls in the company and external calls with the outside world. As a key component of the communication system, the PBX also provides various voice features that the company need to run daily operations.
PBX system
A PBX system manages internal calls in the company and external calls with the outside world. As a key component of the communication system, the PBX also provides various voice features that the company need to run daily operations.
![]() Endpoint
An Endpoint can be an IP phone, a soft phone, or an analog phone. Each user in the company needs an endpoint to make and receive calls.
Endpoint
An Endpoint can be an IP phone, a soft phone, or an analog phone. Each user in the company needs an endpoint to make and receive calls.
![]() Trunk
A trunk or a line is provided by a telephone company, whcih allows the company users to communicate with customers outside the company.
Trunk
A trunk or a line is provided by a telephone company, whcih allows the company users to communicate with customers outside the company.
Configure the PBX to Your Local Area Network
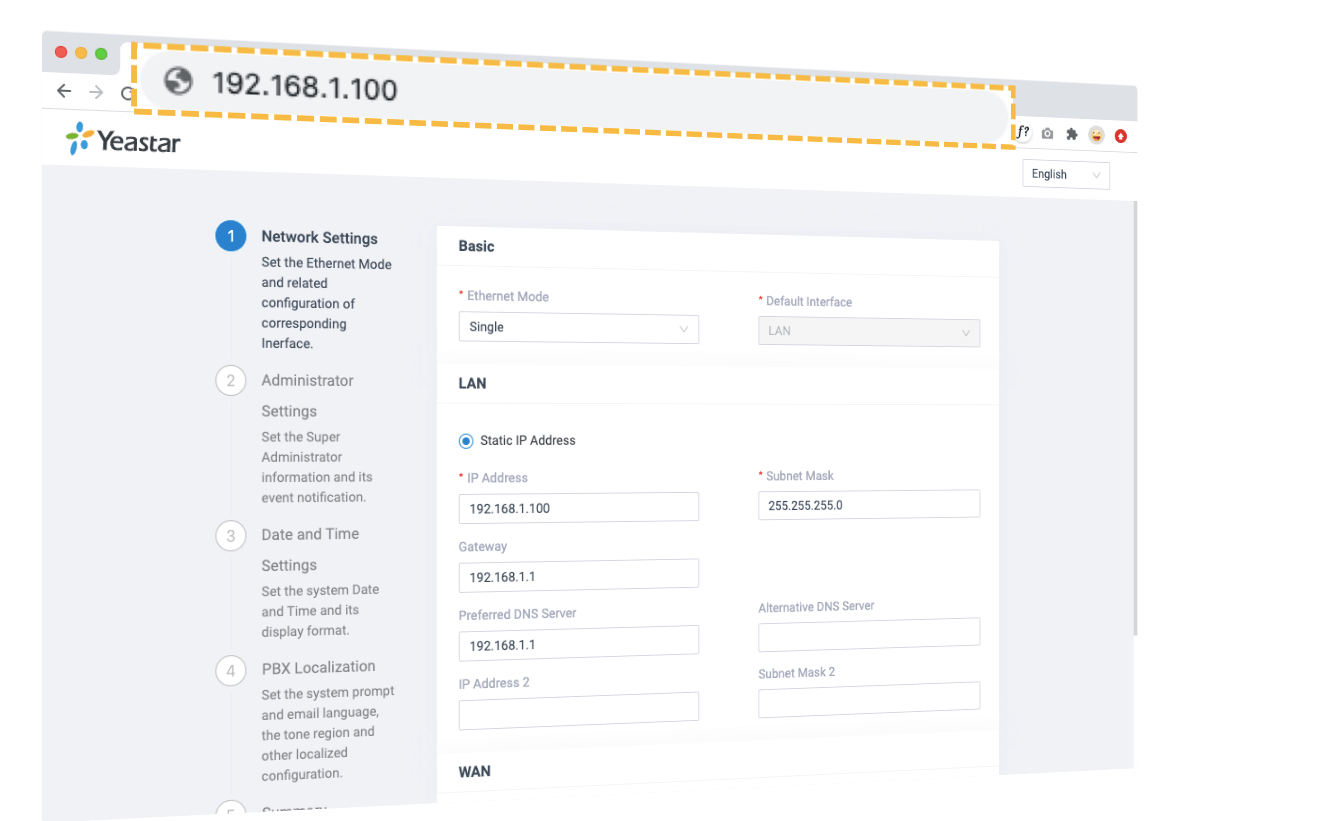
The default IP address of Yeastar P-Series PBX System is 192.168.5.150. With NFC feature, you can easily change the PBX's IP address and connect the PBX to your company's local area network.
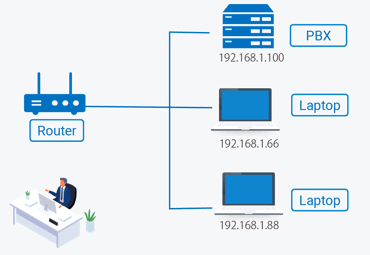
Scenario
In the scenario, the local network deployed in the company is as below:
- IP addresses: 192.168.1.X (X is any number from 2 to 254 )
- Subnet: 255.255.255.0
- Gateway IP address: 192.168.1.1
- DNS:192.168.1.1
The company wants to assign an IP address 192.168.1.100 to the PBX system.
Change PBX's IP Address via NFC
1Download Linkus client on your mobile phone.
2Open NFC scanning page on Linkus Mobile Client.
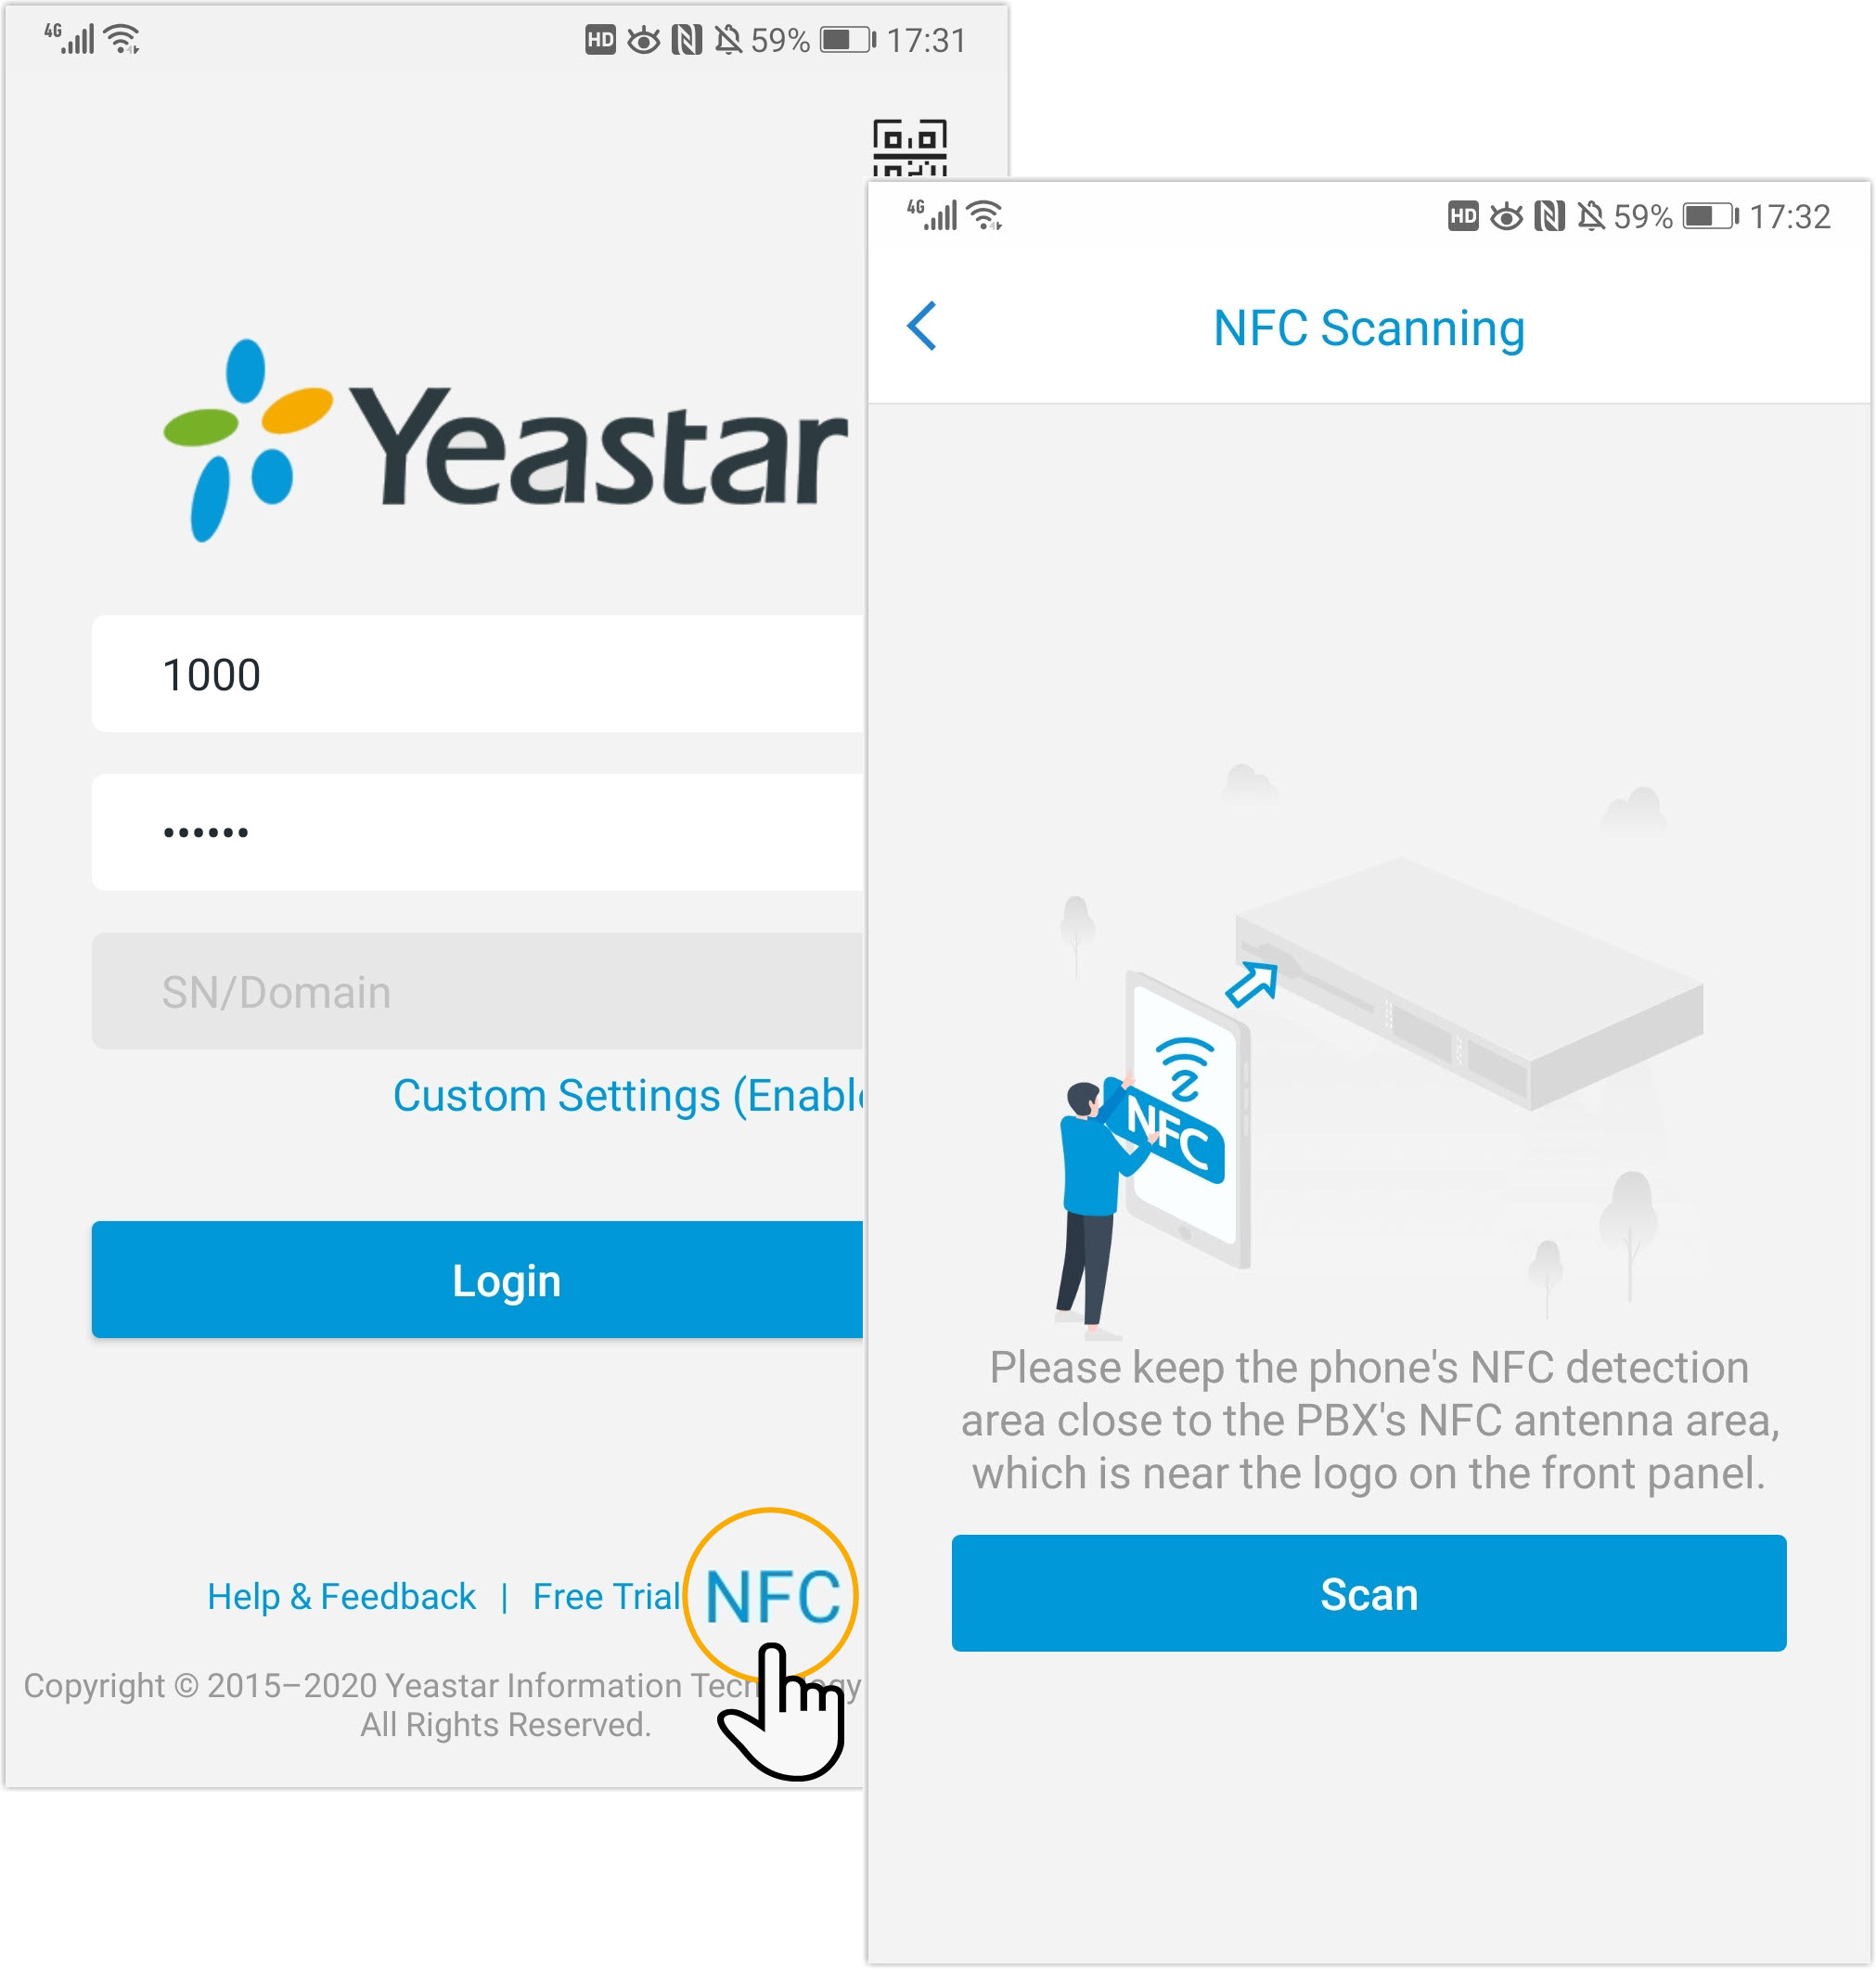
3Keep your phone's NFC detection area close to the Yeastar logo on the PBX. The network configuration page appears on Linkus client.
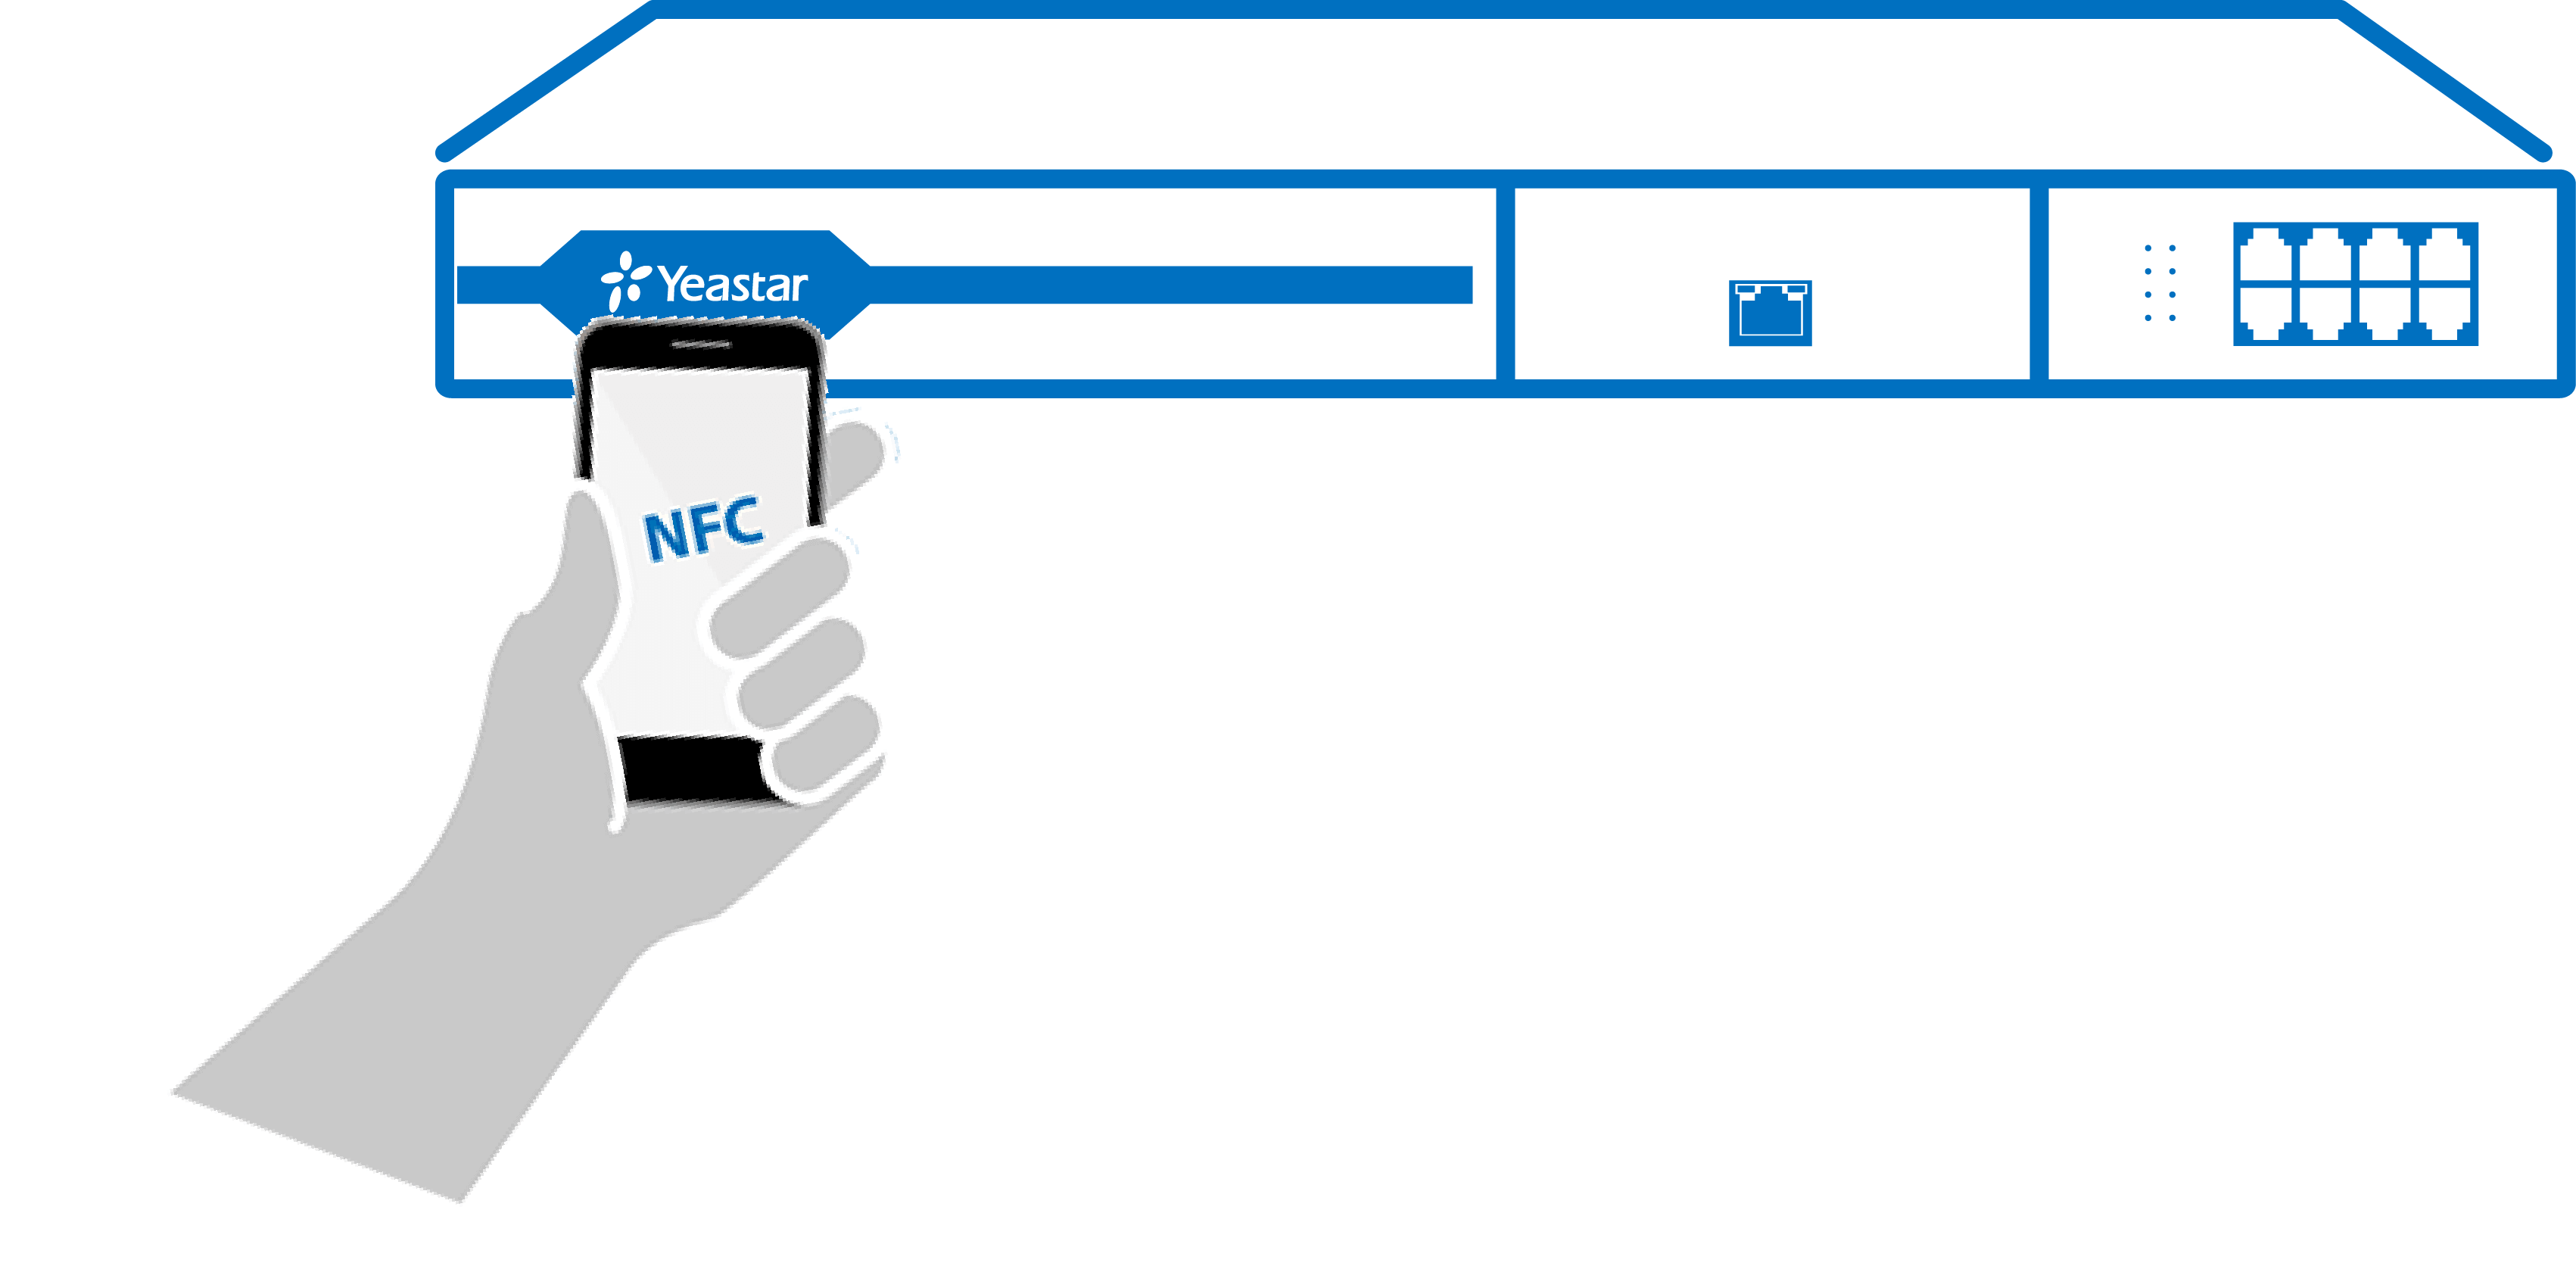
4On the Linkus, configure the PBX's network and confirm the settings. In this scenario, configure the settings as below:
- Mode:Single
- IP: 192.168.1.100
- Subnet mask:255.255.255.0
- DNS:192.168.1.1
- Gateway: 192.168.1.1
5 Scan the NFC tag on the PBX again.
6 Reboot the PBX to take effect.
Access the PBX Web Interface
1Connect network cable.
Use a network cable to connect the LAN port of the PBX to a switch or router, and also connect your PC to the switch or router.
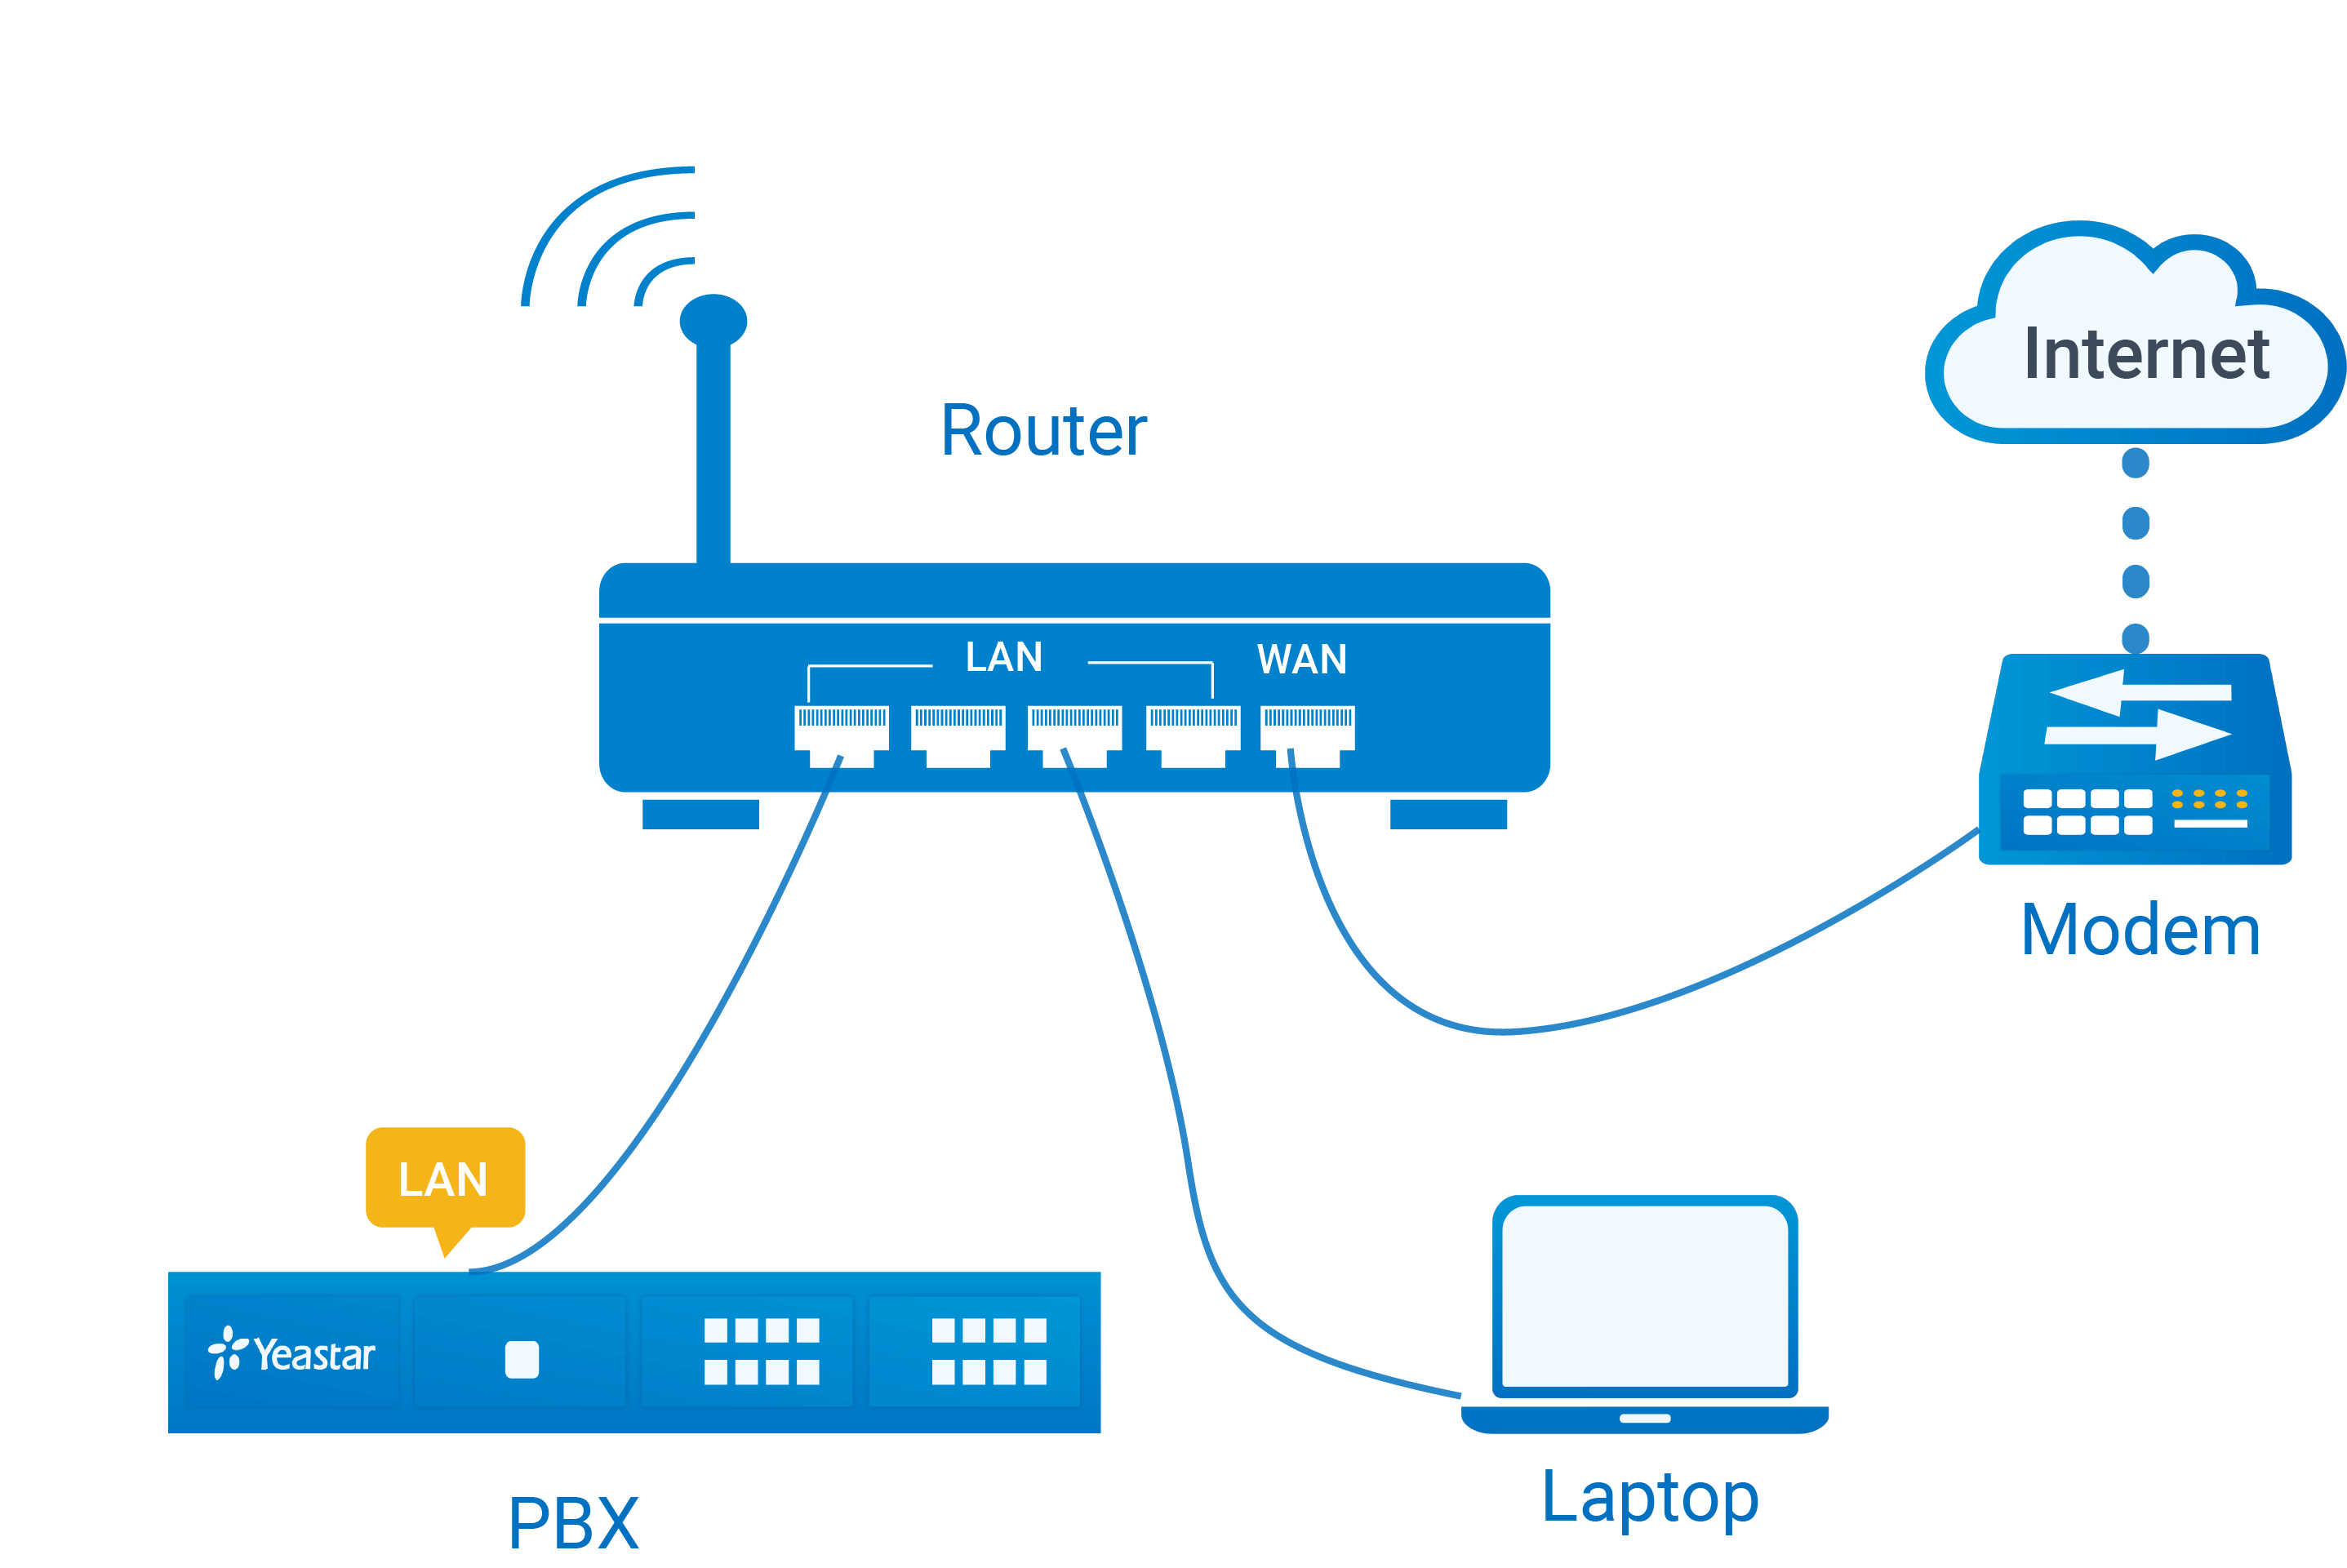
2Open a web browser, enter the IP address of the PBX in the address bar, and press Enter.
You are redirected to the Installation Wizard.
Complete Initial System Setup in the Installation Wizard
Finish the following configurations in the Installation Wizard.
Procedure
1On the Network Settings page, click Next to skip the configurations because you have set up the network settings via NFC.
The system starts to check if the network settings are correct or not.
Note:If a network error is detected, click Previous to reconfigure network or reconfigure later.
2On the Administrator Settings page, set the Super Administrator account and its event notification, and click Next.
Important:Remember the username and password, or you need to RESET the system to get new username and password.
3On the Date and Time Settings page, set the system date and time and its display format, then click Next.
4On the PBX Localization page,configure the system preferences, including the prompt language, tone region, email template language, etc., then click Next.
5On the Summary page, check the above configurations, and click Reboot to take effect.
When the system boots up, log in to the PBX web interface by the username and password configured above.
- Username: Username of super administrator
- Password: Password of super administrator
Assign Extensions to Employees
Extensions are virtual phone numbers that allow calls to be made internally between employees. In this tutorial, we create two extensions for employee Alex and employee Betty.
Create an Extension for Alex
1 Go to Extension and Trunk > Extension , click Add and select Add.
2 In the Basic section, select the extension type to SIP Extension.
3 In the User Information section, enter Alex's basic information.
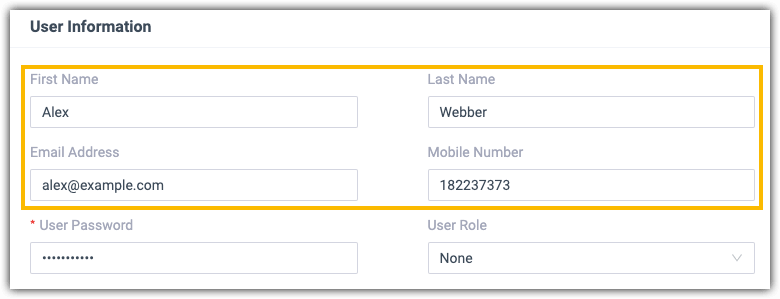
4 Leave other settings as default, click Save and Apply.
Create an Extension for Betty
1 Go to Extension and Trunk > Extension , click Add and select Add.
2 In the Basic section, select the extension type to SIP Extension.
3 In the User Information section, enter Betty's basic information.
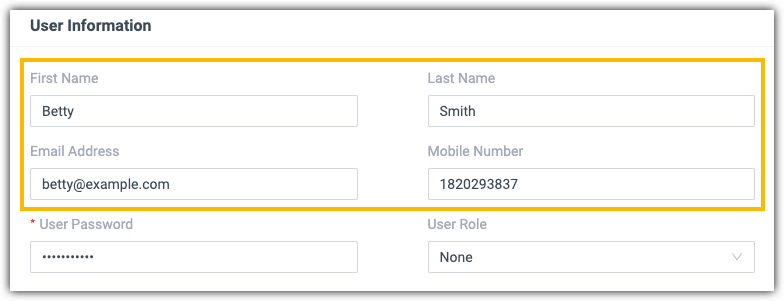
4 Leave other settings as default, click Save and Apply.
Set up Phones for Employees
An extension needs to be registered on an endpoint, so that the employee can make and receive calls via the extension. This tutorial uses Linkus client to show you an easy and efficient way to set up internal communications between employees.
Procedure
1Set up Linkus Server with Remote Access Service (RAS).
Note:RAS is included in Yeastar P-Series Enterprise Plan and Ultimate Plan. You can try out RAS with a 30-day free trial.
1) Go to System > Network > Yeastar FQDN, turn on Yeastar FQDN.
2) In the Fully Qualified Domain Name (FQDN) field, select a domain name then enter a hostname.
Note:Think twice before you enter the hostname. The FQDN cannot be changed after you save the configurations.
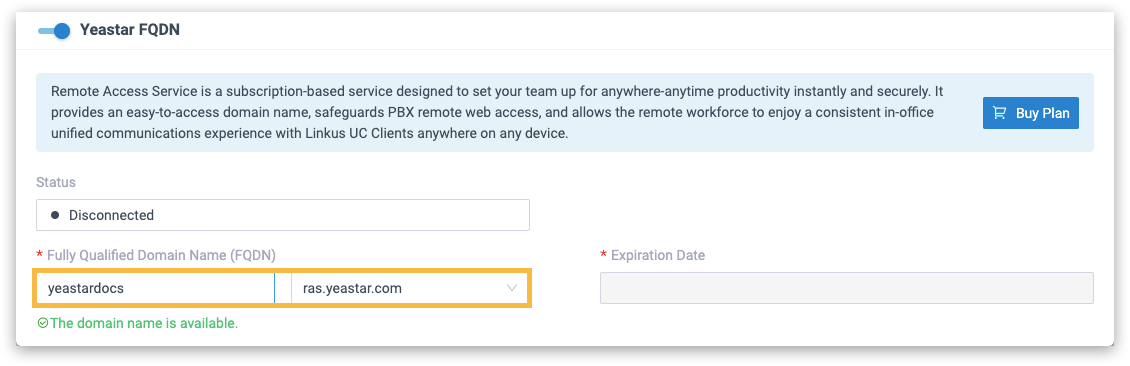
3) Click Save.
Linkus server is automatically set up, users can use Linkus (Mobile Client, Desktop Client, and Web Client) anywhere anytime.
2Send Linkus Welcome emails to Alex and Betty.
1) On the Extension and Trunk > Extension web page, select the uers.
2) Click Welcome Email.
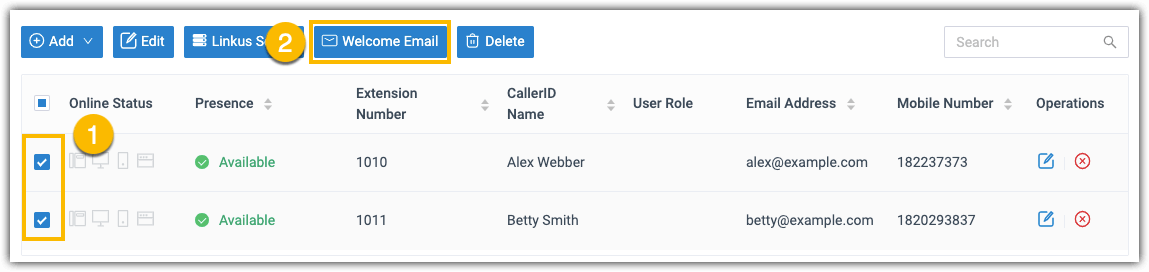
Result
When Alex and Betty receive the emails, they can follow the instructions in the email to log in to Linkus client and communicate with each other any where any time.
Note:For more information of Linkus client, see Linkus Web Client User Guide and Linkus Mobile/PC Help.
Connect PBX System to an Internet telephony service provider (ITSP)
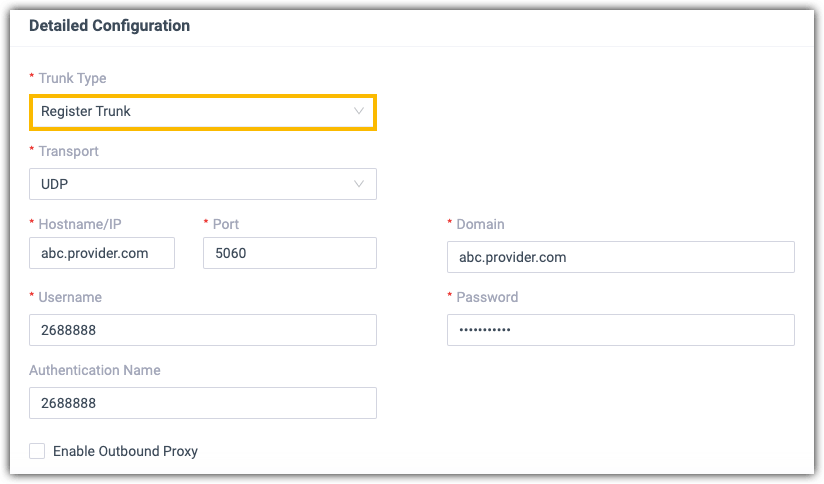
To make a call to outside or receive a call from outside, you need a business phone number (which is called "trunk" in the PBX). This tutorial takes VoIP trunk as an example, which help you communicate with the outside world via internet. The following shows the example VoIP account that offered by the ITSP abc.
- Type: SIP
- Port: 5060
- Transport: UDP
- Authentication name: 2688888
- Authentication password: X92sk*&2jIjc04K
- Trunk number: 2688888
- Domain: abc.provider.com
Procedure
1 Go to Extension and Trunk > Trunk , click Add.
2 In the Basic section, configure the followings:
- Name: Enter a name to help you identify it. In this example, set the name as "voip-abc".
- Trunk Status: Enabled
- Select ITSP Template: General
3 In the Detailed Configuration section, select the trunk type to Register Trunk,
and enter the VoIP trunk information.
Note:Select the trunk type according to the type of VoIP trunk information that is provided by the ITSP. For more information of the VoIP trunk types, see SIP Trunk types .
3 Click Save and Apply.
Result
Check the trunk status on the Trunk list page. If the trunk status shows ![]() ,
your PBX is connected to the ITSP.
,
your PBX is connected to the ITSP.

Make Outbound Calls to Your Customers
Now, the employees can call each other by dialing their extensions number directly on Linkus. How do they call their customers from Linkus? A VoIP trunk is ready, the next you need to set up an outbound route to allow the employees call out through the trunk.
Procedure
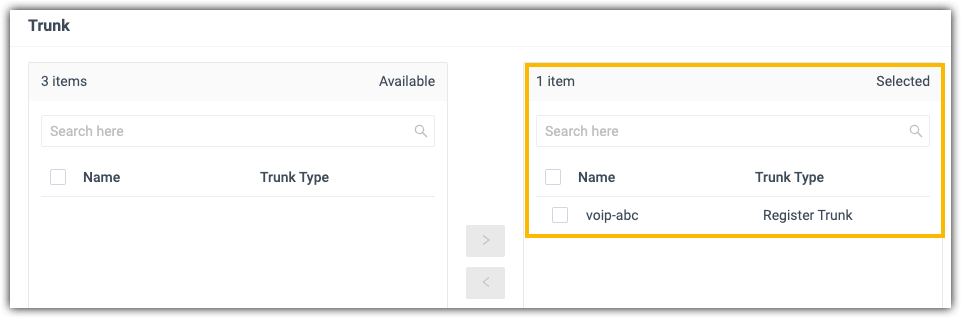
1Go to Call Control > Outbound Route, edit the default outbound route.
The default outbound route has a dial pattern "x." which allows users dial any external numbers.
2Scroll down the page, in the Trunk section, select the VoIP Trunk.
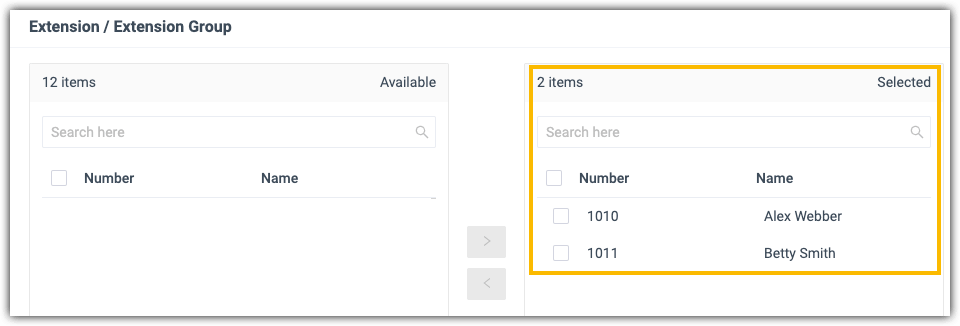
3In the Extension section, select Alex's extension and Betty's extension.
4Leave other settings as default, click Save and Apply.
Result
Alex and Betty can dial external numbers on Linkus, then place the calls to the outside world.
Receive Incoming Calls from Your Customers
The PBX system and the ITSP are connected, but where will the incoming calls go when customers call in the VoIP trunk? You need an inbound route to tell the PBX system where to route incoming calls.
Procedure
1Go to Call Control > Inbound Route, edit the default inbound route.
2Scroll down the page, in the Trunk section, select the VoIP Trunk.
3In the Default Destination section, select Alex's extension as a destination.
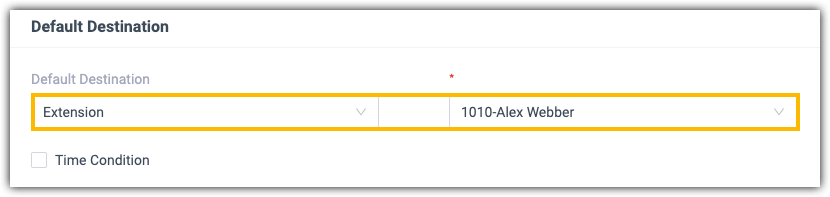
4Leave other settings as default, click Save and Apply.
Result
When your customer calls the trunk number (2688888 ), the call will go to Alex's extension.
<<Previous